Showing posts with label workshop. Show all posts

Wednesday, December 3, 2025

Additional 2025 watercolors from workshops

Here are a few other watercolors from workshops with Leigh Ellis.  In each workshop we worked from photos.  I did not take the photos, and the paintings are not replicas of the reference photos.  

Snow!
We worked on a winter scene of a forest with a stream in the snow.
  • First a light sketch of the stream and surrounding trees.
  • Then a splattering of masking for snow
  • Add light wash for the sky and background trees
  • Paint the dark foreground trees and their shadows on the snow banks
  • Darkening the background trees and add shadows to the snow banks
  • Painting the reflecting light on the stream and the shadows of the banks
  • Darkening edges of the banks, rocks and trees         
  • Create additional depth with shadows and highlights
  • After the painting is completely dry, remove the masking 


Birds in winter and summer
Because we are so familiar with birds, getting many details correct is important:
  • Size and shape of the head, body, tail and wings.
  • Color of key characteristics that identify the species.
  • Realistic body positioning when perching or flying.
  • Correct habitat can also be important.
Birds are very round, and the illusion of roundness on a flat piece of paper is created by creating shadows and highlights.

The colors in the shadows can be cool or warm
  • Cool colored shadows (bue-purple) indicate a winter day
  • Warm colored shadows (brown-purle) indicate a warm summer day

Monday, December 1, 2025

GWS workshop with Iian Stewart

On Aug 16-18 2023,  I attended a three day watercolor workshop, hosted by the Georgia Watercolor Society at the Thomasville Center for the Arts.   The workshop “Painting Land, Sea and Sky” was lead by Iain Stewart, a sought after watercolor instructor.  

Iian is an avid sketcher, and he asked us to bring a sketch book to the workshop.  We used the sketch to make pencil sketches, take notes on design ideas, and paint studies and vignettes.  This is how every painting we did started.


A list of the watercolors Iian uses was suggested for the workshop.  I normally use just 10 colors, and mix what I need from these.  But I was interested in seeing how Iian would use these other colors, and this was my opportunity to try them: Cadmium Scarlet, Naples yellow, Undersea green, Cobalt turquoise, Phthalo blue turquoise, Verditer blue, and Lavender.  


Iian helped us improve our sketching and painting ability. I learned new techniques and was reminded of techniques I learned long ago but forget to use.  


Tomasville is a lovely historic Georgia city.  The downtown has several nice local shops, restaurants and drinking establishments.  While walking around we looked for the lost quail and one of the oldest live oak trees.  We enjoyed tasting some unique drinks at 1861distillery , had a wonderful meal at Chop House on the Bricks and took home some amazing chocolates from sweet cacao chocolates.  


Saturday, January 25, 2025

2025 watercolor workshops with Leigh Ellis

I have taken several watercolor workshops with Leigh Ellis through the years.  I love her paintings.  They glow with light and energy.  So when I heard she had weekly small group workshops I quickly signed up.

The first workshop we worked on painting light.  We did two still paintings one of white flowers and the other of a hay field in the sun.    


The flowers were white on a dark background.  To retain the white of the flowers we masked them, then painted the background.


Once the background was dry, the masking was removed and we painted the branches as flower shadows.


The Hay field was painted in several steps.  First the barn and highlights of sun were masked.  Then a double wash of blue sky and yellow field were layed down on the paper.  Then the tree line at the fare end of the field and the grasses along the front are painted in.  


Below, you can see the painting with masking (pale blue on the barn and hay bales), the washes of blue sky and yellow field, pale green trees in the background and grasses in the foreground.


I did some color testing to determine how I would handle the barn and trees.  


I used quinacridone gold orange and rose; along with mixed greens from cobalt and phalo blue.  


I find testing the color combinations and mixes before adding them to the painting is an important step.  


                                    Below is the finished painting


Friday, April 14, 2023

Abstraction through Design workshop

I participated in a three day abstract watercolor workshop lead by John Salminen

I am not an abstract painter, but over the course of the workshop I discovered that thinking about what makes an abstract painting is interesting can help make more interesting paintings.  Without a defined subject it is the elements of the painting that make it interesting.  The play of colors, dark against light, warm against cold, lines against shapes.

We went through a process of creating a very busy line drawing of random shapes. 

Then we used the lines to help us create a painting with a three armed white object, more or less in the center of the paper, bounded by color.  

The next step was to add some black shapes to define some contracting edges.  Then additional warm and cold colors were added to create interest and movement.  Once I started painting it became easier to add more colors to the painting.

The final shapes we added were cut from magazines and applied to the painting using matte media.  The resulting paintings were very interesting.  This was the hardest part for me.  It took a long time to find items to use and to decide where to add them.  I'm still not sure it is done.

Saturday, April 30, 2022

OCAF & GWS watercolor workshop

Transparent Watercolor on Paper and experimenting with Mixed Water Media on Yupo, a workshop by Mark Mehaffey.  This workshop was offered as part of the 2022 Georgia Watercolor Society's National Exhibition held at OCAF.

It was three day zoom workshop.  During the workshop he provided us with information on his painting methods and techniques.  We were able to ask questions and share our work-in-progress for critique and assistance.  We looked at some of Mark's paintings as part of our discussion.  I would describe the paintings as abstracted realism.  We spent time on planning our paintings.  Using exercises to help us develop the relationship of the shapes, color values.  I learned a lot from the workshop.  

Value studies:

The first watercolor painting was done on heavy watercolor paper with two coats of gesso.  This treatment adds texture and allows easy lifting of paint.  To preserve the paint a sealing coat is sprayed on the painting.  I used a photo of the Grand Tetons from a trip several years ago as my reference.  

This watercolor was done on Yupo, a plastic paper that allows paint to easily flow across the surface.  Paint can also be quickly removed with water.  To preserve the paint a sealing coat is sprayed on the painting.  These are total abstracts.  


Saturday, April 23, 2022

Having Fun with Plein Air

For this OCAF class a small group of plein air artists ventured out to some beautiful  local gardens to sketch and paint.  We all gathered at the appointed location in the morning.   We started with a brief introduction by the garden owners.   Then spread out across the garden, each looking for an inspiration to paint.  While we were painting the instructor Jack Burk moved around asking us about our painting plan and making helpful suggestions.  

Plein air items I brought to the gardens:

  • 3 legged folding chair
  • Drawing board
  • Watercolor paper
  • Watercolor travel pack with watercolor paints, water brushes, eraser, pencil, etc.
  • Water bottle for me to drink
  • Sun/rain hat
One of the gardens was very well landscaped and had some lovely garden art.  I chose to paint a metal bird that was lit by the morning sun.

We visited a historic working farm that had walled gardens and beautiful old buildings and trees.  An old tire swing beyond one of the older wooden buildings caught my eye.  It reminded me of a painting done by Teresa Dean that featured a tire swing in the front yard of a farm house.

The sky was overcast, but the sun was beginning to break through.  The light was lighting up the tops of the grass and tree tops in the distance.  


Monday, November 1, 2021

Printed Story: workshop

FBAC on-line class The Printed Story taught by Catherine Cross Tsintzos.

In this class we each developed a story, determined a layout and design for a book, created graphics and text for the story, and completed one small accordion or pamphlet book.

Week one we worked on a theme for our story.  We discussed art books and storytelling using images and words.  To help develop the overall layout and design of our book we used storyboards.  The Storyboard was 6-8 squares: two squares for the beginning, 2-4 squares for the middle, and 2 squares for the conclusion.  Each frame included a sketch, text and notes on boarders, colors etc. 

I decided to tell the story of how we created a wildflower garden for my Mother-in-law.   
  • It starts with the field and plowing.  
  • The middle is about the plants growing.  
  • The end is about the butterflies that visit the wildflowers.


Week two we worked on relief printmaking techniques.  Because I had them already, I used Speedball water soluble inks, baren, hard brayer and linoleum cutting set.  We used thin linoleum that can easily be cut into smaller shapes.  

I used photos of the garden, flowers and insects as references for the lino stamps I carved.
Field sketch and cut lineo block

Photo and cut lineo blocks

I did several test prints to learn how to mix the 3 colors of ink to get the color I wanted (light green, oranges, browns, black).  

test printing smal lieno blocks
 
I did test prints to determine if printing the smaller blocks over the full page green field would work (i.e. would the colors show up; would the design work).

test printing flower blocks over printed green field


Week three we worked on printing and assembling the final book.

I created a cover for the pamphlet book, printed one side of the pages and let that dry for a few days, then carefully printed on the other side.  I painted backgrounds on the flowers and butterflies pages.  I added tissue paper between the pages to protect the ink.  

Cover
first and second pages with tissue paper between


Friday, October 1, 2021

Exploring Marbling: Suminaghashi

I enrolled in another FBAC on-line class: Explorations with marbling, taught by Catherine Cross Tsintzos

In this class we learned about Suminaghashi (“floating ink”), the accent art of Japanese marbling. Ink is placed on the surface of a dish of water using pointed brushes (Sumi brushes) such that it floats on the water. A design is created by alternating a ink (traditionally black or indigo ink are used) and non-ink (soapy water). Each new addition pushes early drops out across the surface of the water, creating concentric rings. I used black and other colored inks from a marbling kit.

Suminaghashi setup used
 
Disturbances caused by air (blowing or fanning) or touching the surface (toothpick or tiny brush) can be used to change the concentric pattern into an irregular shape or create a mirror image.


Paper is gently placed on top of the floating ink on the surface of the water to capture the pattern. The choice of paper determines how well the ink is picked up and how durable the print will be. I used Yatsutomo Hosho Rice paper, BlackInk Speedball Fine Printmaking Paper (a mix of mulberry and bamboo fibers), BFK Rives Printmaking Paper (100% cotton), and watercolor paper. I liked the results on the Speedball and BFK papers best. The rice paper was thin and tore easily. The watercolor paper was thick and the ink diffused a little.

Acrylic and oil paints can be used in a similar way to make prints. Additives are used to thin the paint so it will effectively flow on top of the water. Suminaghashi can also be used to create patterns on natural fabrics (raw silk, cotton etc).

I used some of the finished Suminaghashi paper as book covers and signature wraps to make additional Criss cross bound books.

Book spine and covers ready to be bound

Bound book cover


Monday, June 21, 2021

Criss cross binding

 I have wanted to try making a book using the Criss cross binding for some time, so I was excited to see a class being offered at the Frederick Book Arts Center.  This binding is also known as the Secret Belgian binding.  The allure of this book is the signatures are bound to the spine of the book in a way that lets you remove/replace them.  The unique stitching also lets the cover and pages lay flat. 

I preparation for the class we cut and covered board for the front, back and spine of the book.  I used some fancy peacock feather paper for this.  We also folded and pressed 8 signatures.

We punched holed in the covered front and back boards for stitching.  Both the vertical and horizontal spacing of holes can be varied, allowing for endless designs.  I punched 6 holes 1" from the front edge with varied vertical spacing.

The signatures are 1/4" shorter than the boards.  I made a template to punch the signatures that accounted for the difference in hight and matched the vertical spacing of the six holes.

The cover is stitched/woven together first.  We used binder clips to hold the three sections of the cover in place while stitching (blue tape can also be used).  I used 4 ply Irish linen waxed thread, though often thicker thread or ribbon can be used.  

Stating at the top on the inside front cover, go out the top hole leaving a short tail of thread behind, come in from the outside in the gap between the front board and the spine and go back out in the gap between the spine and the back board, then in the top hole on the back cover, wrap around the spine in the opposite direction, tie a square knot with the tail of the thread near the top hole on the front board, continue out the top hole on the front cover, wrap around the spine a third time, go in the top hole of the back cover one last time.  The first station is now complete.  

Go out the second hole on the back cover, wrap around the spine, go out the second hole of the front cover, wrap around the spine in the opposite direction, go in the second hole of the back cover, wrap around the spine a third time, go in the second hole of the front cover one last time.  The second station is now complete.

Repeat the process for the remaining stations and tie off the thread at the end of the sixth station.

We used a sort of running pamphlet stitch to attach the signatures to the threads that wrap around the inside of the spine.  If desired, you could attach each signature independently to the spine using multiple pamphlet stitches.  Cutting the pamphlet stitches allows you to remove the signatures from the book.

I quickly made a second book using some beautiful marbled paper a friend made.  I used a photo of the 2021 Brood X Cicadas for the front and back signature wraps.  


Monday, May 17, 2021

Making wildflower seeded paper

I attended an online class hosted by Frederick Book Arts Center "Gardener's Blizzard Book".  The book artist Catherine Cross Tsintzos presented information on book binding and paper making techniques to create a Gardener's Blizzard Book with handmade and hand dyed paper.

The Blizzard book is a complicated folding of a long strip of paper to create a series of pockets that can act as a book spine to hold additional pages.  This book design was developed by Hedi Kyle.  I found a wonderful blog that discusses the book form and as well as a video that shows how to do do the folds very clearly.  I am not going to be using the Blizzard book I made to hold my seed pages (I have a different use for them).  However, this is a very cool book design and I will be using it in other projects.  

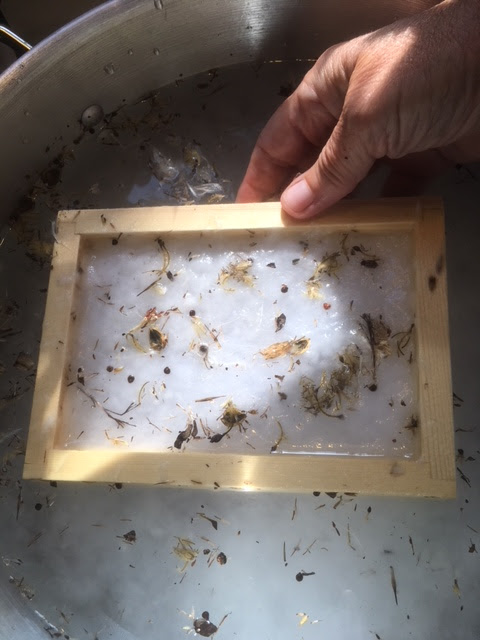
This is my first attempt at making paper.  I used a food processor to convert torn paper into wet pulp.  I transferred the pulp to a water filled VAT (really just a big shallow pan).  I sprinkled dried wildflower seeds I had collected last fall on top of the water.

I carefully lowered my small deckle box into the vat, and slowly raised it to the surface while gently shaking it to distribute the pulp and seeds evenly. 


After pressing most of the water out of the pulp, I opened the deckle box and transferred the wet pulpy seed paper to a glass sheet to dry.  When the paper was dry I carefully pealed it off of the glass pane.  


Take aways from my first try at paper making:
  • Add more pulp to the VAT - or the paper will be very thin
  • The glass has to be VERY clean - or the paper will stick 
  • It would be nice to have some color - dye or dried flower petals
  • It is not as messy as it looks and it is lots of fun
Final note.  I used up the left over pulp and seeds in the vat by making a few small seed bombs. 


Monday, May 3, 2021

Revisiting rusting (part 2)

In the online FBAC class "Traces of Beauty: Rust Prints", Lauren G. Koch presented information on rusting techniques for both paper and fabrics.  I have never tried rusting fabric, but was interested in trying.  Below are the steps and results.

Items used:

  • Water
  • Salt
  • Vinegar
  • Spray bottle with a mix of vinegar and water (~70/30)
  • Newspaper
  • Bricks
  • Rusty bits (cut metal, nails, barbed wire etc)

I soaked a piece of 100% cotton cloth in warm salt water overnight.  I laid the went piece of cloth out flat.  A variety of rusty metal bits were placed on the top half of the cloth, and sprayed with the vinegar/water mixture.  The lower half of the cloth was folded over the top half (covering the rusty metal bits).  Additional rusty metal bits were placed on the left side of the folded cloth, and sprayed with the vinegar/water mixture.  The right side of the folded cloth was then carefully folded over the left side (covering the rusty metal bits).  On top of the folded cloth and rusty metal bits I added some sheets of folded newspaper and a big brick.  I checked on the folded cloth a few times during the afternoon, re-wet the cloth if it was dry.  I left the folded cloth stack to continue to rust overnight.

The next afternoon I carefully unfolded the cloth, and removed the rusty metal bits.  I rinsed the cloth in water to remove any vinegar residue.  The results are not as striking as my rusty paper experiment, but I am still happy with the results.


Monday, April 26, 2021

Revisiting rusting (part 1)

Five years ago I took a Book arts class at the John C Campbell Folk School led by Holly Fouts and Cheryl Prose, where I was introduced to rusting metal and paper.  Just recently I attended an online class hosted by Frederick Book Arts Center "Traces of Beauty: Rust Prints".  Lauren G. Koch, another amazing artist, presented information about rusting techniques using artwork she and artists she has worked with created.  We had several great class discussions about process and techniques.  

I combined her suggestions on rusting techniques with directions on how to rust multiple pages for my paper rusting experiment.  Below are the steps and results.

Items used:

  • Water
  • Salt
  • Vinegar
  • Spray bottle with a mix of vinegar and water (~70/30)
  • Newspaper
  • Bricks
  • Rusty baking pan
  • Rusty bits (cut metal, nails, barbed wire etc)
  • Black tea

I soaked three sheets of RIVES BFK paper in water until completely wet.  The first sheet of wet paper was placed in the rusty baking pan.  A variety of rusty metal bits were placed on top of the paper, and sprayed with the vinegar/water mixture.  I also sprinkled some loose black tea on the paper.  This process was repeated for the second and third sheets of paper.  On top of the stack I added some sheets of folded newspaper and two big bricks.   

I checked on the stack a few times during the afternoon, re-wet the pages if they were dry.  I left the stack overnight.

The next afternoon I carefully disassembled the stack and rinsed the three pages in water to remove any remaining vinegar.  I was quite happy with the results.  

  • First two are the top and bottom of the sheet of paper on the top of the stack.  
  • Second two are the top and bottom of the middle sheet of paper.  
  • Third two are the top and bottom of the last sheet of paper that was resting on the baking pan and was completely rusted.