Showing posts with label bird. Show all posts

Wednesday, December 3, 2025

Additional 2025 watercolors from workshops

Here are a few other watercolors from workshops with Leigh Ellis.  In each workshop we worked from photos.  I did not take the photos, and the paintings are not replicas of the reference photos.  

Snow!
We worked on a winter scene of a forest with a stream in the snow.
  • First a light sketch of the stream and surrounding trees.
  • Then a splattering of masking for snow
  • Add light wash for the sky and background trees
  • Paint the dark foreground trees and their shadows on the snow banks
  • Darkening the background trees and add shadows to the snow banks
  • Painting the reflecting light on the stream and the shadows of the banks
  • Darkening edges of the banks, rocks and trees         
  • Create additional depth with shadows and highlights
  • After the painting is completely dry, remove the masking 


Birds in winter and summer
Because we are so familiar with birds, getting many details correct is important:
  • Size and shape of the head, body, tail and wings.
  • Color of key characteristics that identify the species.
  • Realistic body positioning when perching or flying.
  • Correct habitat can also be important.
Birds are very round, and the illusion of roundness on a flat piece of paper is created by creating shadows and highlights.

The colors in the shadows can be cool or warm
  • Cool colored shadows (bue-purple) indicate a winter day
  • Warm colored shadows (brown-purle) indicate a warm summer day

Saturday, June 11, 2022

Found on the beach

We had the opportunity to visit Little St Simon's Island for a Georgia Audubon 3 day Ornithology workshop.  We had a wonderful time helping the researchers band Painted Buntings (and other birds); count nesting spoonbills, storks, ibis, herons, egrets and anhinga in the rookeries, and checking on nesting sea birds at the beach.  


While on a trek up the beach to see Wilson Plover chicks and American Oystercatcher nests we notices a bouy that had washed ashore.  I took several photos from different angles as references.   I used a panoramic photo for the watercolor sketch in my travel journal.  


Tuesday, August 4, 2020

Online wattercolor class

I hadn’t done much painting this year, since all the art classes had been canceled due to the pandemic.  No trips to John C. Campbell Folk School or weekend workshops at Spruill, or classes at OCAF or Lyndon House.   I really needed the push to paint that a class provides.  We meet once a week for four weeks online, and uploaded our finished work to a shared space were we could comment and discuss the paintings.  

The class focus was on using water to controlling how the paint moves on the paper.  We practiced adding very wet paint to dry and wet paper.  Adding dry paint to wet paper.  Using a dry brush to remove water and paint from the paper.

Then we painted a landscape from a photo.  I roughly sketched in the buildings and edges of the field.  I wet the sky and painted a morning sky with red and yellow.  I painted in the field where the light was reflecting off the wet grass.  I painted the buildings where the rising sun was casting long shadows.

I painted the dark tree line and used a dry brush to pick up pigment from the tree tops.  

I painted the grasses in the foreground, leaving  some areas white for the flowers.  Finally, I added more shadows.


Next we painted a white dogwood flower.  The only thing defining the white flower are the shadows.  They are soft, but need to be dark enough to give the petals shape.  

For the center we practiced negative painting.  Painting the dark spaces between the yellow pistils.  

Finally we used dark paint for the background letting the colors mix.  The darker the background the more the flower shows up.  Too dark or the wrong mix of colors creates a muddy background.

For the third painting we painted a humming bird.    These birds have distinctive color patterns and shape.  The position of the head, placement of the bill and eye all need to be correct.

The tips of the wings are indistinct and a trail follows the wings to suggest movement. The pose of the bird suggests reaching up, so I added an orange trumpet vine flower.

The background was painted wet on wet, allowing the colors to mix.  The darker shades around the flower and bird help define their shapes.


For my final painting I selected a photo of a pink azalea.  I used one red and one blue pigment for the flower.  

The lighter pink shades are made by mixing more water with the red paint.  

The shadows are made by mixing blue into the red paint. 

The background was painted wet on wet and has indistinct green leaves and additional pinkish flowers.  


Sunday, March 26, 2017

Watercolor bird workshop

I recently had the opportunity to attended a watercolor workshop at Oconee Cultural Arts Foundation by Leigh Ellis.  Leigh paints wonderfully vibrant watercolors, many are natural landscapes or wild animals.  This workshop focused on painting birds.  Leigh provided us with many tips from her many years as a painter and naturalist.  I was inspired by Leigh's teaching and the great paintings of the class members.  I look forward to attending future classes Leigh has.

During the workshop I worked on three paintings: a Red Ibis, Warbler and Rooster.  Before sketching the Ibis we discusses bird anatomy and how correct positions of the head and bill improve the realistic look of the painting.  The Ibis is basically all the same color with slight differences in value.  The changes in light across the bird's plumage are what provide shape for the wings and body.  I left out all but a few leaves and branches, letting the red bird stand out from the dark wet on wet background.

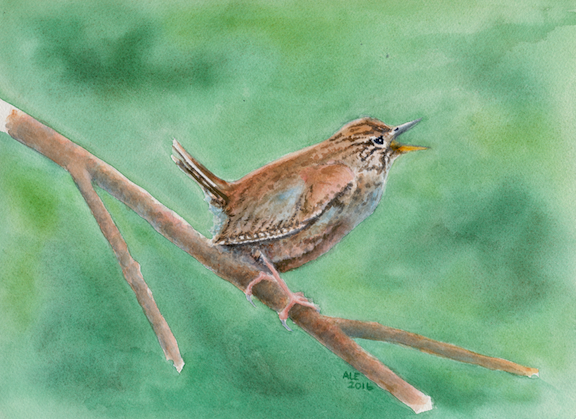
For the Warbler painting I focused on the attitude of this feisty little bird; clinging to a small branch, tail cocked singing out for all the world to hear.  A variety of browns, pale blue and hints of red makeup both the bird and the branch he sits on.  The background is a wet on wet mix of greens.

In contrast, the Rooster is full of many vibrant colors.  I didn't paint individual feathers, but grouped the feathers to define the birds shape.  Some of painting is knowing how to let the viewer "see" what is not actually there.  Distance, depth, 3D and even color are achieved by the combination of what is painted and what our brains perceive.  For instance, the juxtaposition of dark and light colors provide the "shine" of the Rooster's tail feathers. Only one tail feather stands out, the one that is out of place.  Maybe it was pulled during a scuffle in the farm yard.

Thursday, August 13, 2015

Volunteer Sunflowers, part 3


The tale of the Sunflowers didn't end with my painting.  After the flowers were pollenated, the ray flowers shriveled and fell off and the flower heads drooped.  It would take several weeks for the seeds to finish maturing and be ready to harvest.  My plan was to harvest and dry the flower heads with the seeds intact, to later user to feed the birds.  Every few days I checked to see if they were ready to be harvested.

One day I found cracked sunflower seeds on the backs of the flower heads.  Birds had discovered the seeds and were beginning to eat them.  Over the next week I watched Gold Finches, Cardinals and Crows come to the garden and wrestle individual seeds from the flower heads.  The flowers that had fed the bees, and provided me with beautiful subjects to paint were now feeding the birds too.

Seeds were pulled from the edges first, then further towards the middle as they too matured.  The birds had to be quite acrobatic to remove the seeds, hanging over the edge of the flower, or even upside down.  Their struggles would make the flowers shake violently.


Sunday, August 4, 2013

Project Robin: fourth painting

The Robin in the third painting was much better, but due to flaws in the paper, I needed another painting.  As long as I was doing another painting I planned on some additional refinements.  I decided a less distracting and chaotic background could improve the overall composition of the painting.  I made a pencil sketch massing color areas in the background and foreground.  I used the sketch as a basis for developing an overall color pattern that would flowed across the page.  

Next I took a closer look at the leaves of the Japanese Red Maple, Acer palmatum atropurpureum, to better understand their individual and combined color ranges.  Early spring leaves are orange-red, they turn red-purple to green in summer, then back to red in the fall.  The variety of color combined with the shape of the palmate leaves make it easy to understand why these trees are so popular.  To the left is the page for the Japanese Red Maple that I added to my Tree journal.  I started the journal way back in 2011 as part of a course I took at the John C. Campbell Folk School.

Finally, I tested how the color pigments I would be using for the leaves would combine and play together.  I used what I found from these tests to decide which colors to lay down first to create the orange and green shades in the painting.

In the fourth (and final) painting all the small branch in front of the Robin were eliminated, leaving only a few small branches in the background.  I painted the Robin, nest and branches first, and then uses the same wet-on-wet technique to add one swath of color at a time, letting them run together, covering the branches and edges of the nest.  I came back and defined a few distinct leaf shapes.

The colors in the fourth painting are muted, similar to the first painting, but because the colors are massed the red-oranges create a distinct foreground and the greens push into the background framing the Robin.

Saturday, July 27, 2013

Project Robin: third painting


I wanted brighter colors and I liked how the background leaves turned out, but adding so many bright leaves in the background distracted from the rather dark and uninteresting Robin in the second painting.  It was time for a third painting.  Before doing the painting I studied Robins and worked on getting the pose of the Robin sitting in the nest.  I decided to eliminate a few more branches and also to make the nest the full height (as it was in the first painting).  I painted the Robin, nest and branches first, but did not mask them.  I then uses the same wet-on-wet technique that I used in the second painting to add in the background, but with fewer distinct leaves.  Unfortunately there was a flaw in the paper that only appeared after I had started painting the wet-on-wet background.  I finished the painting anyway, knowing a fourth painting would be needed.

Saturday, July 20, 2013

Project Robin: second painting


The small branches in front of the Robin and the seeds in the first painting were distracting, and the colors were not bright enough in some areas of the painting.  Also the nest seemed to sit on top of the branch, instead of behind it.  I quickly decided to do a second painting removing the seeds, some of the branches and making the nest shorter.  To brighten the colors I decided to use the method I learned from Margaret Walsh Best.  I painted the Robin, nest and a few branches first, masked them.  

The wet-on-wet background was added in two layers, the first was Phthalocyanine Blue and Lemon Yellow and the second was Quinacridone Rose and Cadmium Yellow.  Finally I added a few leaf shapes.  When I removed the masking from the Robin and nest it removed some of the paint and raised the paper.  When I added paint back the paper quickly absorbed it making it difficult to control how the paint spread.

Sunday, July 14, 2013

Project Robin: first painting


I've been working on a painting of a Robin for a friend's birthday.  It is based on a photo I took of a nesting Robin in our Japanese Red Maple tree (Acer palmatum atropurpureum).  I noticed the Robin's nest while using the scope to watch the Bluebirds in the Martin House.  I was looking through the branches of the Red Maple at the Martin House.  The Red Maple is a beautiful tree, it leafs out red and as the leaves mature they slowly change to green.  The progression of red to orange to yellow to green can be seen on each leaf like a reverse of fall coloration.     The Robins had made a large twig nest in the lichen covered branches of the tree, and it was framed by the multi-colored leaves of the Red Maple.

I began working on the Robin project about a month ago.  In that time I have done four paintings.  Each painting has its good points, and each was done slightly differently in an effort to improve what I didn't like in the previous painting (more on those later).  The one thing they all have in common is a palette of Quinacridone Rose, Phthalocyanine Blue, Cadmium Yellow and Lemon Yellow.

For the first painting I used the poured watercolors method I learned from Kie Johnson during a workshop earlier this year.  First I masked the Robin, nest, seeds and branches.  Then I poured Quinacridone Rose and Cadmium Yellow on the paper for the first layer.  After the paint dried I poured a second layer of Phthalocyanine Blue and Lemon Yellow.  

After the second layer dried I removed the masking and painted the Robin, nest, seeds and branches.  I used a bit of Yellow Ochre and Burnt Umber in the nest and branches.  I also added a few suggestions of leaves to the background.  

Saturday, June 29, 2013

Backyard birds

This year has been a wonderful year for bird watching in our yard.  We noticed a lot of wood chips on the patio and discovered a pair of Yellow-shafted Flickers (Colaptes auratus auratus) had decided to carve a nest cavity in the old Paper Mulberry tree outside the kitchen window.  The location gave us a great view of the Parent birds as they came and went, and later of the fast growing chicks being fed.  We were lucky enough to watch the chicks fledge, taking flight from a dead tree limb.  I took many photos but haven't done any paintings of them yet.

On the other side of the house a pair of Bluebirds had taken up residence in one of the 12 cubbies in our Martin house.  In 12 years, our Martin house had never even tempted a Purple Martin once, it had always been a condo for Purple Finches and House Sparrows.  But this year we are the proud landlords of two beautiful Bluebirds.  While we could watch the parent Bluebirds fly about the yard catching insects and eating berries, the Martin house is too high for us to easily view the interior.  We set up a spotting scope that allowed us to see dim shapes moving inside the Martin house.  I spent a morning working on a sketch of the parents feeding the chicks (upper part of the page).

We had cleaned out the Martin house once we were sure the Bluebird chicks had fledged and the parents were no longer visiting the house.  This was a bit of a task since the telescoping pole the house is on has rusted together and we couldn't lower it.  We ended up using a 12 foot ladder to climb up to the house to clean it.  But it was worth the effort, we were rewarded by having the Bluebirds build a second nest the very next day!

We have spotted the young Bluebirds from the first clutch in the yard.  They look like odd half sparrow half Bluebird birds, with blue wing and tail, but a brown stripped head and breast.  I added sketches of the parents and one of the first clutch immature Bluebirds to the lower part of the page.

Sunday, June 23, 2013

Sketching birds

The plan was to spend an hour or two sketching flowers at the  Georgia State Botanical Garden.  The roses are in full bloom now and they were my target.  The roses are in the new terraced garden, at the far end from the lower parking lot.   As I walked along the winding garden path on my way over to the rose garden I heard an irritated chirp chirp chirp.  As I got closer I caught fleeting glimpses of a small yellow bird flitting from branch to branch.  Stopping only to emit a few abrupt chirps before moving on.

Since I had binoculars but not a camera or bird book, I decided to take a few notes and do a quick sketch of  the bird.  This should be quick and easy I thought, and I could identify the bird when I got home.  Well 30 minutes later I was still working on the sketch.  The bird was small, fast and dodging around leaves and branches giving me glimpses of only bits and pieces.  It lead me up and back down the garden path several times.  I did however, with the help of the binoculars manage to take enough notes that with my pencil sketch I was able to identify the Kentucky Warbler (Geothlypis formosa).   This was a new sighting for me, so it was well worth my time.

The yellow underside without any spots or stripes, the black mask that extends down the neck like side burns, and the yellow stripe that wraps around the eye were the distinctive characteristics that helped me identify the bird.  After reading that these birds nest in bushes near the ground I realized the bird was trying to defend a nest (which I never saw).  This also explains the mohawk hair style the bird was sporting.  I never heard the bird's normal call, since it was so irritated with the foot traffic along the path.  

I did finally make over to the roses, but by then it was hot and there isn't a lot of shade in that area of the garden for comfortable sketching.  The roses sketching would have to wait for another day.