Showing posts with label process. Show all posts

Tuesday, March 14, 2023

Little bound story book

I purchased a stuffed Ossabaw Sicilian donkey for my nephew.  He is quite a Winnie the Pooh fan, so I decided to also get him a stuffed Eeyore, and to make a little book about the two of them meeting.  

After roughing out a story,  I had an idea of how many illustrations were needed.  I started working on sketches,   Over time, a rough story and illustrations slowly converged into what could be a little story book.  

It would have 8 pages.  I would need 10 illustrations: front cover, front page, 6 for the story, back page and back cover; and the text needed to fit in the available space of the 6 story pages.

I used watercolor paper for the 4 signatures (8 pages) of the book.  The illustrations were inked and painted.  Then text was added to the pages.  Finally I sealed the pages with a non-toxic watercolor sealant.  Finally I was ready to put together the little story book.  

 Punching the covers
Last page and inside of back cover
Bound book


Friday, February 3, 2023

REpurposed books

Our local library has a book sale twice a year.  I Usually help either setting up for the sale, or boxing up the the unsold books after the sale.  I always find a few books to bring home and repurpose as journals.  I choose books with interesting covers.  Some of the books also have pages with poetry, illustrations or photos that can be use as signature covers, or to line the inside of the journal covers. 

I start by breaking down the books.  Carefully removing the text block from the book.  If the spine of the book is not in good condition, it will not be reused.  

For most of the books, both the covers and spine are reused.  Book cloth and sometimes book board are used to reinforce the spine.  Signatures are created to fit the repurposed covers.  Templates are made and the spine and signatures are punched.  Then its time to reassemble the parts into a journal.  There are many different binding patterns that can be used, and I've enjoyed trying several new ones while making these repurposed books.  


If the spine is so damaged it can not be reused, it is cut in half then folded and glued to the inside of the covers.  These covered boards are used to make coptic bound journals.  I typically use 5 signatures of the appropriate size for each journal.  There are a few ways to sew a coptic binding.  There are methods that use two needles, and others that use only one needle.  Some patterns bind the text block together first using long or french stitch, and then attach the covers using a coptic stitch. thers bind the covers and text block at the same time using a coptic stitch.  In the event the covers are damaged, I recover the book boards with decorative paper and the edges of the spine with book cloth for reinforcement.


Monday, November 1, 2021

Printed Story: workshop

FBAC on-line class The Printed Story taught by Catherine Cross Tsintzos.

In this class we each developed a story, determined a layout and design for a book, created graphics and text for the story, and completed one small accordion or pamphlet book.

Week one we worked on a theme for our story.  We discussed art books and storytelling using images and words.  To help develop the overall layout and design of our book we used storyboards.  The Storyboard was 6-8 squares: two squares for the beginning, 2-4 squares for the middle, and 2 squares for the conclusion.  Each frame included a sketch, text and notes on boarders, colors etc. 

I decided to tell the story of how we created a wildflower garden for my Mother-in-law.   
  • It starts with the field and plowing.  
  • The middle is about the plants growing.  
  • The end is about the butterflies that visit the wildflowers.


Week two we worked on relief printmaking techniques.  Because I had them already, I used Speedball water soluble inks, baren, hard brayer and linoleum cutting set.  We used thin linoleum that can easily be cut into smaller shapes.  

I used photos of the garden, flowers and insects as references for the lino stamps I carved.
Field sketch and cut lineo block

Photo and cut lineo blocks

I did several test prints to learn how to mix the 3 colors of ink to get the color I wanted (light green, oranges, browns, black).  

test printing smal lieno blocks
 
I did test prints to determine if printing the smaller blocks over the full page green field would work (i.e. would the colors show up; would the design work).

test printing flower blocks over printed green field


Week three we worked on printing and assembling the final book.

I created a cover for the pamphlet book, printed one side of the pages and let that dry for a few days, then carefully printed on the other side.  I painted backgrounds on the flowers and butterflies pages.  I added tissue paper between the pages to protect the ink.  

Cover
first and second pages with tissue paper between


Monday, June 21, 2021

Criss cross binding

 I have wanted to try making a book using the Criss cross binding for some time, so I was excited to see a class being offered at the Frederick Book Arts Center.  This binding is also known as the Secret Belgian binding.  The allure of this book is the signatures are bound to the spine of the book in a way that lets you remove/replace them.  The unique stitching also lets the cover and pages lay flat. 

I preparation for the class we cut and covered board for the front, back and spine of the book.  I used some fancy peacock feather paper for this.  We also folded and pressed 8 signatures.

We punched holed in the covered front and back boards for stitching.  Both the vertical and horizontal spacing of holes can be varied, allowing for endless designs.  I punched 6 holes 1" from the front edge with varied vertical spacing.

The signatures are 1/4" shorter than the boards.  I made a template to punch the signatures that accounted for the difference in hight and matched the vertical spacing of the six holes.

The cover is stitched/woven together first.  We used binder clips to hold the three sections of the cover in place while stitching (blue tape can also be used).  I used 4 ply Irish linen waxed thread, though often thicker thread or ribbon can be used.  

Stating at the top on the inside front cover, go out the top hole leaving a short tail of thread behind, come in from the outside in the gap between the front board and the spine and go back out in the gap between the spine and the back board, then in the top hole on the back cover, wrap around the spine in the opposite direction, tie a square knot with the tail of the thread near the top hole on the front board, continue out the top hole on the front cover, wrap around the spine a third time, go in the top hole of the back cover one last time.  The first station is now complete.  

Go out the second hole on the back cover, wrap around the spine, go out the second hole of the front cover, wrap around the spine in the opposite direction, go in the second hole of the back cover, wrap around the spine a third time, go in the second hole of the front cover one last time.  The second station is now complete.

Repeat the process for the remaining stations and tie off the thread at the end of the sixth station.

We used a sort of running pamphlet stitch to attach the signatures to the threads that wrap around the inside of the spine.  If desired, you could attach each signature independently to the spine using multiple pamphlet stitches.  Cutting the pamphlet stitches allows you to remove the signatures from the book.

I quickly made a second book using some beautiful marbled paper a friend made.  I used a photo of the 2021 Brood X Cicadas for the front and back signature wraps.  


Monday, May 3, 2021

Revisiting rusting (part 2)

In the online FBAC class "Traces of Beauty: Rust Prints", Lauren G. Koch presented information on rusting techniques for both paper and fabrics.  I have never tried rusting fabric, but was interested in trying.  Below are the steps and results.

Items used:

  • Water
  • Salt
  • Vinegar
  • Spray bottle with a mix of vinegar and water (~70/30)
  • Newspaper
  • Bricks
  • Rusty bits (cut metal, nails, barbed wire etc)

I soaked a piece of 100% cotton cloth in warm salt water overnight.  I laid the went piece of cloth out flat.  A variety of rusty metal bits were placed on the top half of the cloth, and sprayed with the vinegar/water mixture.  The lower half of the cloth was folded over the top half (covering the rusty metal bits).  Additional rusty metal bits were placed on the left side of the folded cloth, and sprayed with the vinegar/water mixture.  The right side of the folded cloth was then carefully folded over the left side (covering the rusty metal bits).  On top of the folded cloth and rusty metal bits I added some sheets of folded newspaper and a big brick.  I checked on the folded cloth a few times during the afternoon, re-wet the cloth if it was dry.  I left the folded cloth stack to continue to rust overnight.

The next afternoon I carefully unfolded the cloth, and removed the rusty metal bits.  I rinsed the cloth in water to remove any vinegar residue.  The results are not as striking as my rusty paper experiment, but I am still happy with the results.


Monday, April 26, 2021

Revisiting rusting (part 1)

Five years ago I took a Book arts class at the John C Campbell Folk School led by Holly Fouts and Cheryl Prose, where I was introduced to rusting metal and paper.  Just recently I attended an online class hosted by Frederick Book Arts Center "Traces of Beauty: Rust Prints".  Lauren G. Koch, another amazing artist, presented information about rusting techniques using artwork she and artists she has worked with created.  We had several great class discussions about process and techniques.  

I combined her suggestions on rusting techniques with directions on how to rust multiple pages for my paper rusting experiment.  Below are the steps and results.

Items used:

  • Water
  • Salt
  • Vinegar
  • Spray bottle with a mix of vinegar and water (~70/30)
  • Newspaper
  • Bricks
  • Rusty baking pan
  • Rusty bits (cut metal, nails, barbed wire etc)
  • Black tea

I soaked three sheets of RIVES BFK paper in water until completely wet.  The first sheet of wet paper was placed in the rusty baking pan.  A variety of rusty metal bits were placed on top of the paper, and sprayed with the vinegar/water mixture.  I also sprinkled some loose black tea on the paper.  This process was repeated for the second and third sheets of paper.  On top of the stack I added some sheets of folded newspaper and two big bricks.   

I checked on the stack a few times during the afternoon, re-wet the pages if they were dry.  I left the stack overnight.

The next afternoon I carefully disassembled the stack and rinsed the three pages in water to remove any remaining vinegar.  I was quite happy with the results.  

  • First two are the top and bottom of the sheet of paper on the top of the stack.  
  • Second two are the top and bottom of the middle sheet of paper.  
  • Third two are the top and bottom of the last sheet of paper that was resting on the baking pan and was completely rusted.


Sunday, September 13, 2020

Journals and bookmaking notes

One of the items I took to my first bookmaking class was a handmade journal someone had given me to keep notes in.  

My journals include:

  • Class notes.
  • Quick sketches.  
  • Scraps of paper and leather.
  • Cord to illustrate twists and knots.
  • Other items used in bookmaking.


Keeping journals is very helpful.  I refer back to them all the time to find out what type of paper I used for pages, how many pages were in each signature, what were the page and cover dimensions, what dye I used on the paper, how to stitch a spine pattern or tie a knot.  I have even sent photos of my journal pages to someone else to explain how to make a book.


Friday, May 1, 2020

Hearts to thank frontline community workers

This spring the John C Campbell Folk School asked for donations of heart shaped crafts for their new Hearts at Work project.  Almost 3,000 hearts were sent from students, staff and instructors who have attended the school.  The school presented the hearts to essential workers in the local county.

Heart shaped books are not new, and there is an online tutorial based on the traditional heart shaped book.  However, I remembered seeing a unique small heart shaped book pattern in one of the books I have.  Books and Journals, by Constance E. Richards included instructions for making a heart book necklace.  I adapted her design to make my little books.  

Each book is made up of origami folded pages cut to form a heart.  The pages are glued together so that the can open.  Heart shaped card stock is used for the covers, and a ribbon is used to tie it shut.  I was happy with how these little origami fold books turned out.


Friday, October 18, 2019

Upcycled container books

I have been experimenting with using recycled material for book covers.  It all started with the vegetable containers we received with our Hello Fresh meals.  The images on the boxes were so retro and pop art.  They made lovely little books.  

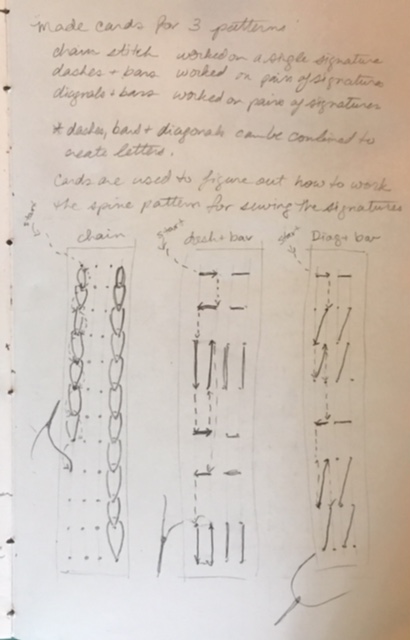
Since the containers are all different sizes, I have to determine the amount of pages and dimensions; then create spine and signature stitching cards.  


Friday, October 11, 2019

Stab bookbinding

Stab binding is an ancient method of book binding.  It is often referred to as Japanese Stab Binding, though variations of this method are practiced in China and Korea.  Basic 4 hole stab binding is a simple and economic way to bind many pages of paper together.  You can also use complex stitching patterns and special papers to create beautiful books.

I decided to use this method to bind smallish paper scraps left over from other projects.  I also experimented with using some Vintage postcards as covers.  I used the Japanese Tortoise shell and Hemp leaf stab binding patterns. 


Saturday, August 10, 2019

Multi-color dyed leather books


I have been dying leather using water based dyes and have experimented with mixing the colors to create unique leather book covers.  

One day I saw a video on using using Rit all-purpose powder dye to tie-dye teeshirts (https://www.ritdye.com/techniques/ice-dye/).  Rit dye has long been used to dye leather shoes and purses, so I decided to try the ice technique to dye some leather book covers.   

Besides the dye and ice you need a large container, something to support the leather above the bottom of the container and gloves to keep your hands from being stained too.


The vegetable tanned leather is cut to the desired book cover size.  The cut leather is placed on top a white expandable storage shelf that is inside a large plastic container. Using this setup I can dye two large book covers at a time. 

Crushed ice is piled on top of the leather, covering all of the surface to about 1.5 inches deep.  Various colors of Rite dye are sprinkled on top of the ice.  I do this outside, so depending on the temperature, it takes 1 to 3 hours for the ice to totally melt. 

As the ice melts the dye dissolves and runs down on to the leather.  The colors mix making puddles of colors that, as more ice melt, drip of the edge of the leather into the plastic container.  This process creates unpredictable swirls of mixtures of colors. I let the leather sit over night to dry.  

Once the leather is dry I can add freehand ink drawings or stamps to the surface.  The final step is to apply a sealant to the leather. Below are three finished books.  I found a multi-colored skull button that is the perfect finishing touch.