Friday, October 18, 2019

Upcycled container books

I have been experimenting with using recycled material for book covers.  It all started with the vegetable containers we received with our Hello Fresh meals.  The images on the boxes were so retro and pop art.  They made lovely little books.  

Since the containers are all different sizes, I have to determine the amount of pages and dimensions; then create spine and signature stitching cards.  


Friday, October 11, 2019

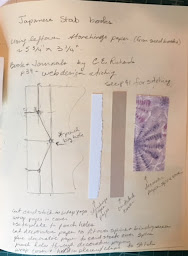
Stab bookbinding

Stab binding is an ancient method of book binding.  It is often referred to as Japanese Stab Binding, though variations of this method are practiced in China and Korea.  Basic 4 hole stab binding is a simple and economic way to bind many pages of paper together.  You can also use complex stitching patterns and special papers to create beautiful books.

I decided to use this method to bind smallish paper scraps left over from other projects.  I also experimented with using some Vintage postcards as covers.  I used the Japanese Tortoise shell and Hemp leaf stab binding patterns. 


Friday, September 13, 2019

Fishing and sketching in Western Montana

Four of us went out to visit a friend who had recently moved to Montana.  We stayed in a single story log Forest Service Cabin down the road.  Like our previous cabin, this one had outdoor plumbing, but is entirely electricity (lights, stove and refrigerator).  The homestead was built in the 1890s by a former slave and her common-law husband. This cabin and the one we had previously stayed in were restored by Forest Service volunteers.   

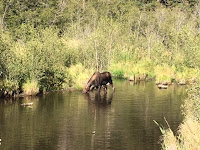
The river was an easy walk across the field. We often saw Moose crossing the river near where we fished.  We hiked and fished along the river most days.  On this trip I caught and released my first Cutthroat Trout.  


We also did some sight seeing in Missolua and Philipsburg.  


Driving on the narrow twisty dirt roads that follow the rivers we encountered deer and big horn sheep.


Saturday, August 10, 2019

Multi-color dyed leather books


I have been dying leather using water based dyes and have experimented with mixing the colors to create unique leather book covers.  

One day I saw a video on using using Rit all-purpose powder dye to tie-dye teeshirts (https://www.ritdye.com/techniques/ice-dye/).  Rit dye has long been used to dye leather shoes and purses, so I decided to try the ice technique to dye some leather book covers.   

Besides the dye and ice you need a large container, something to support the leather above the bottom of the container and gloves to keep your hands from being stained too.


The vegetable tanned leather is cut to the desired book cover size.  The cut leather is placed on top a white expandable storage shelf that is inside a large plastic container. Using this setup I can dye two large book covers at a time. 

Crushed ice is piled on top of the leather, covering all of the surface to about 1.5 inches deep.  Various colors of Rite dye are sprinkled on top of the ice.  I do this outside, so depending on the temperature, it takes 1 to 3 hours for the ice to totally melt. 

As the ice melts the dye dissolves and runs down on to the leather.  The colors mix making puddles of colors that, as more ice melt, drip of the edge of the leather into the plastic container.  This process creates unpredictable swirls of mixtures of colors. I let the leather sit over night to dry.  

Once the leather is dry I can add freehand ink drawings or stamps to the surface.  The final step is to apply a sealant to the leather. Below are three finished books.  I found a multi-colored skull button that is the perfect finishing touch.


Unexpected find

We spent a long weekend Camping.  We had a nice spot under the tress that shaded our camper.  We did some hiking, swimming and star gazing.  We took the opportunity to visit nearby towns to taste some local beer and food.  We walked around town checking out some local shops.  We were not looking for anything in particular, and I was totally surprised to fined a small press.  Needles to say this heavy cast iron press came home with me. 

A copy press is a small press that can be used to apply equal pressure for a variety of bookbinding purposes.  A Copy press is similar to a nipping presses.  Copy presses were used to make copies of freshly written documents.  The fresh ink of the document was transferred to damp tissue paper using the pressure of the copy press.  The copy printed on the tissue paper is the reverse of the original document.  Tissue paper was used so the reader could read the through the paper.

I plan on using my copy press to compress book signatures and to print linocuts.  

Tuesday, March 12, 2019

Bahamas sailing and sunsets

 On nice thing about my small watercolor kit, it is super easy to travel with.  That means I have it with me all the time.  Ready to paint wherever I am.  For example, the second night I was able to paint the below sunset while we were anchored off Abaco Island.


We spent a wonderful week sailing around the Bahamas.  From Abaco Island we sailed to Green Turtle Cay, Fowl Cay National Park, Man-o-war Cay, and Elbow Cay.  We anchored off shore or picked up a mooring bouy in the harbor.  Each night we watched the sunset; and the following morning the sunrise.  

Friday, February 22, 2019

Watercolor Retreat day 5


The Final day we painted a girl on the beach.  This was the most challenging painting of the retreat.  There was moving water, reflections on the sand, and a human form.  

We started by painting the wet sand, leaving the area of the girl’s reflection unpainted.  

Then we painted the shadows on her clothes.  I used a grey green color for the shadows of the skirt.  It doesn’t look right now, but when red is painted on top the shadows will look right. 


Next I painted the ocean:

  • Leaving bits of white in the foreground for foam, in the mid ground for waves, and in the background for sun reflections.
  • Adding darker shadows under the waves at the shoreline

I then painted the girls skin: 

  • Leaving highlights, adding mid tone shadows.
  • Adding her reflections on the sand.


I painted the girls hair.  Then masked the dots on the skirt and painted it red. The last item was darkening some shadows and finishing the reflection on the wet sand.  


Thursday, February 21, 2019

Watercolor Retreat day 4


The fourth day we worked on a painting of an egret on an oyster bar at sunset.  We used the techniques we had practiced earlier (masking areas of the painting and layering transparent pigments).  

This time we painted the bird and oysters first.  

When the painting was dry we masked the bird.  Making sure to cover all the small feathers.

Then vertical lines of yellow and pink were painted.  Followed by horizontal lines of purple.  The paper and paint were very wet, allowing the paint to flow across the paper and mix.  These lines create the reflections and ripples on the water, as well as the mud of the oyster bar.


When the painting was dry the masking was removed.  Additional shadows were added to the oysters and mud.  The brush used for the masking didn't have a fine tip so the feathers are a bit blunt, but I still was happy with how the painting turned out.


Wednesday, February 20, 2019

Watercolor Retreat day 3


The third day we worked on a new technique.  Using true transparent yellow, red and blue pigments to paint a marsh at sunset (Aureolin Yellow, Quinacridone Rose & Cobalt Blue).  Most paint is a combination of various pigments.  A true color contains a single pigment.  A transparent paint lets lets you see through one layer of paint to the one below.  

We first painted yellow where the marsh grass, trees and their reflections in the water are.  After the yellow paint was completely dry we painted red on the sky and water.  

After the red was completely dry we painted blue on parts of the sky, trees, marsh, and water.  To darken the trees and make the deep shadows in the marsh I added more blue.  It was amazing to see how well this technique worked.


Ironically, the spring high tide flooded the backyard and the streets around the house we stayed in.


Tuesday, February 19, 2019

Watercolor retreat day 2

After a wonderful breakfast we started working on the next exercise.  An egret flying over the marsh.  I started by painting the sky and water, the colors are reflections of each other. Then painted the shadows on the bird.  The shadows have shades of color from the water (blue to purple) and sun (pink to yellow).  

When the painting was dry, I masked the bird and painted the marsh, adding yellows and greens to develop depth and distinguish the dry areas of the marsh (yellow to brown) from the wet ones (shades of yellow green).   This was done wet, letting the colors mix.

I masked part of the foreground of the marsh and continued to darken areas of the marsh and painted the distant trees.  Once the painting was dry I removed the masking.  The masked areas of the march now stand out as lighter colored grass blades.  I completed painting the bird, and adding some final shadows to the marsh and tree line.


Monday, February 18, 2019

Watercolor retreat

What is better then spending time at the beach?  Spending time with other watercolorists at the beach!  Eight of us shared a house at Murrells Inlet SC for the retreat.  Leigh Ellis, a local watercolor artist and teacher, lead daily classes working with us on color mixing, painting birds and water.  

I brought my Plein air watercolor prochade box, equipped with the paints I needed for class (and a lot more):
  • Cobalt Blue
  • Phthalo blue
  • Burnt Sienna or quinacridone burnt orange
  • Aureolin Yellow
  • Quinacridone Rose  or permanent rose
  • Paynes Gray
  • Qunacridone Gold
For our first exercise we worked on trees along a grassy bank and reflections on the water. I painted the trees and grass first. Then wet the lower half of the page and working very wet added reflections.  

It took several passes to develop the shadows on the trees, grass and the reflection in the water.


While we worked from photos, we were inspired by the marsh outside and trips to Brook Green Gardens.  I had last been there many years ago.  It was wonderful to see how it had grown and all the new sculptures they now have.