Wednesday, April 1, 2015

Colorful Orchids

My last visit to Asheville started on a warm day, perfect weather for plein air sketching.  Overnight the temperature dropped and the light rain turned to snow!  My ambition to walk around outside sketching also dropped.  As it turned out I was in luck.  The North Carolina Arboretum just happened to be hosting the 2015 Western North Carolina Orchid Society annual show.  Thousands of orchids filled the downstairs of their Education Building, providing me with numerous subjects to paint.  There were a lot of people viewing and photographing the orchids, including me.

The Orchid family is one of the largest families of flowering plants, with roughly 25,000 species.  They exhibit a dizzying variety of sizes, shapes and colors.  After taking many photos of different orchids I headed over to the cafe for an early lunch.  While in the cafe I did a watercolor of one of the orchids I had photographed.  I had brought my small watercolor journal kit that has a Van Gogh watercolor Pocket Box.  I used a palette of warm and cold shades: yellow (254, 269), red (311, 370), blue (506, 535) and burnt sienna (411).

As noon approached and the number of people looking for lunch increased, I decided to relocate to the other building.  There I found a comfortable chair near the fireplace, which had a lovely fire going, and did four more little watercolors.  I say little because I was using a Strathmore spiral bound 3" x 5" book.


Sunday, March 15, 2015

Colorful Salmon flies

I recently read an article about historic fly patterns used for Salmon fishing.  Salmon flies are nothing like the tiny drab colored insect mimic flies I have in my fly boxes.  Salmon flies are big, and bright and often mimic small fish.  I picked four beautiful fly patterns to paint for use on note cards.  Wet on wet was used to blend the base feather colors.  Additional details on the large feathers and the hackles were dry brushed.

The "Durham Ranger" is a quintessential classic pattern.  These intricately dressed flies were used for Atlantic salmon fly fishing during the nineteenth and twentieth centuries.  Fly patterns from that time used colorful feathers from large, and often exotic birds.  Today, tying these flies is considered an art.

Bits of fur, feathers and shinny tinsel are carefully tied to a hook to imitate insects, fish, other foods or just something that will catch a fish's interest.  The "Policeman" was designed for Salmon fishing on the river Tay in Scotland.  In the water, this fly imitates a bait fish.  

Different patterns are used for different types of fish and for fish from different locations.  The "Rock Island" streamer is a modern fly designed for trout fishing in British Columbia (Designed by Monte Smith).

The "Copper Lake" is a modern classic in the "Ghost" style (Designed by Monte Smith).  The first of this style, the "Grey Ghost" pattern, was created by Carrie G. Stevens, a self-taught fly tier from Maine.  The streamer was designed to be used for river casting and resembled the bait fish found there.  It remains a popular fly pattern and is still used for Atlantic trout and salmon fishing.


Sunday, February 22, 2015

More Trout cards

The third trout pattern represents a Rainbow Trout.  These trout have olive-green backs with dark olive to black spots.  A bright pink stripe of color splashes along the mid-line of the body, fading to white on the abdomen.  The small clear scales of the fish produce an iridescence where the light reflects off of them, which I represented by lifting off some of the paint.

I was satisfied with the Brown and Rainbow Trout patterns I had painted, but the Brook Trout pattern didn't look quite correct.  After looking at several photos of Brook Trout I realized what fly fishers refer to as a "worm" pattern on the back and upper sides of the trout resembles patterns seen in some corals.  Also the spots and vermiculate pattern were actually yellow, not white or light olive color which lifting the wet paint had created in previous paintings.  To achieve the pattern seen on the fish in the photos I needed to use a different painting techniques then I had been using so far.

The first step was to lay down a blended wash of Aureolin Yellow across the top of the paper and Cadmium Red Light along the bottom.  The colors join and mix just below the middle of the page.  Before the paint dried I created several "white" spots in the middle and lower half of the painting by lifting off the wet paint.  After the paint dried I added a little Winsor Blue to the "white" spots in the middle to create the halos for the red spots I would add later.

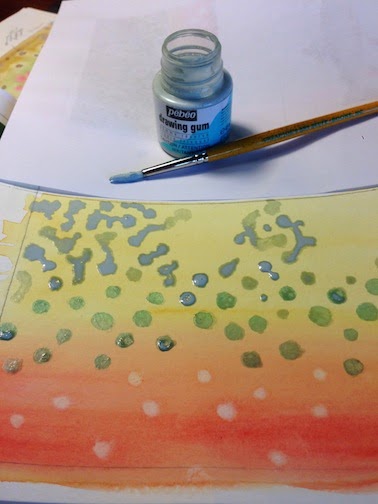
Next I used masking fluid to cover the blue spots in the middle.  I then added additional masking to the upper part of the painting to create the "vermiculate and spot" pattern trout exhibit on their back and upper sides.  In the photo to the left I had already covered the blue spots and was half way through adding additional masking to finish the trout's upper pattern.

Once the masking had completely dried I wet the upper part of the paper using a light mist of clean water.  I added a graded wash composed of a mixture of Sap Green, Burnt Siena and Raw Umber to create the olive-green and brown of the trout's back and upper sides.  Once the final wash was dry I removed the masking to reveal the lighter spots and "worm" pattern.  The photo to the right was taken when I was halfway through removing the masking.


Masking fluid creates a sharp edge where the pigment of the wash could not penetrate the paper.  I softened these edges by adding clean water and lightly rubbing the edges.  The step was to use Rose Madder to add small red spots in the center of the light blue spots.  To the right is a photo of the finished painting.