Friday, September 14, 2018

Montana land of the big sky

Six of us headed out to Montana to do some fly fishing.  We rented a Forest Service Cabin; a log homestead built in 1917.  It sits in the valley between tree topped hills along side a small rocky creak that flows into a bigger rocky creek where we fished.

The fall landscape is beautiful.  Winding blue water framed by Golden grass covered fields and tall green pines with red bark; tree covered hills with Rocky outcrops; brilliant blue skies with billowing white clouds.

The two story cabin had a propane stove and lights.  It didn’t have a refrigerator, so we kept our food in coolers on ice.  A shed behind the house contained the pit toilet, shower and wood storage area.  The largest part of the shed was occupied by wood, since we used the central wood stove to heat the house.


While painting the cabin I notice movement in grass, a mountain grouse was out foraging.


We spent most of our days fishing and relaxing on the porch.  I caught and released several Rainbow and Brown Trout.  


Monday, September 10, 2018

Fly fishing and sketching

I have been fishing my whole life.  By the time I was five, I was helping clean the fish we caught.  Blue fish, Striped Bass, Rock fish, Porgies and Blowfish were all common in the sound and bay.  I spent my time near the water, on the water, and in the water every day of summer vacation.  If we weren't fishing we were scalloping or clamming or sailing or swimming or walking the beach.    

I learned to Fly fishing much later in life, but found it to be just as wonderful as my childhood summers.  I am outside standing in a clean rocky stream surrounded by forests, fields and mountains.  I fish for trout use barbless hooks, and practice catch-and-release.  Casting is more challenging and getting your line tangled more common, and the frustration can ruin an otherwise great day.

When I start to get frustrated I find a place to sit, drink some water and do a few sketches.  I carry a small  pocket sketch book and pencil in my waders.  I sketch what ever is around me.  After a few sketches I am calm and ready to start fishing again.


Thursday, March 29, 2018

Printing and Books: Double pamphlet stitch book

The final two classes were devoted to making a Double pamphlet stitch book (also known as Japanese double pamphlet).  The pamphlet stitch is an easy way to bind a small book.  It consists of one signature and a cover.   The signature will have only enough pages to be easily fold.  That can be from 2 to 15 pages, depending on the thickness of the paper.  The size of the paper, determines how many holes are used to stitch the spine of the book.  The most common are three or five, but more holes can be used if needed.  The binding always has an odd number of holes.  A double pamphlet stitch book has two signatures, so it has double the amount of paper.

Materials
  • Paper: 10 sheets of 8 1/2" by 11" lightweight paper that easily folds
  • Cover: 1 sheet of medium weight card stock
  • Book cloth: 3" x 5 1/2"
  • Thread: ~17" (3x the length of the spine)
The book has two signatures with 10 folios each.  The paper is cut to make in half to make twenty 8 1/2" wide x 5 1/2" tall sheets.  These pages are divided into two sets of 10 pages each.  Each set of pages are folded in half and creased to make a signature that is 4 1/4" wide x 5 1/2" tall.

Cut the card stock in half to make two 8 1/2" wide x 5 1/2" tall sheets.  Fold and crease each sheet in half to form 4 1/4" wide x 5 1/2" tall covers (one for the front and one for the back).

The book’s spine is made from a piece of book cloth that is folded lengthwise to form a “W”.  Fold the book cloth in half lengthwise first and crease the fold.  Then fold each long end back to the middle, creasing the folds.

Attach the front and back covers of the book to the book cloth so that each cover is folded over one end of the book cloth.  Measure and mark 3/8" along the inside edge of each cover.  Spread a thin laver of glue along the 3/8" x5 1/2" strip of one cover.  Attach the cover to the outside wing of the book cloth lining the edge of the book cloth to the 3/8" line that was drawn.  Spread the inside of the card stock with glue and press the two sides of card stock together.  Repeat with the other piece of card stock.  Press the cover flat and let dry.


Make a stitching template with three holes.  One hole in the middle (2 3/4" from top), and the others 3/4" from top and bottom.  Use the template to punch holes in the two signatures and the valleys of the book cloth "W".  


Stitching the signatures to the book cloth.  Thread the needle.  Place one signature into each of the valleys of the “W”.  Hold them in place using a paperclip.  The two signatures will be stitched to the book cloth using a single pamphlet stitch.  Open each signature so their pages are back to back.  You will have one side of each signature with both covers between them in one hand and the other sides of each signature with the middle of the "W" in your other hand.  Start with the middle hole and stitch through one signature, the "W" and the other signature, leaving a 1" tail.  Next stitch the top holes bringing the thread back.  Stitch the bottom holes.  Finally stitch through the middle hole again, making sure to come up on the opposite side of the thread that runs from the top hole to the bottom hole.  Tie the tail and remaining thread off.


Instead of photos of making the book, i am using photos from my notes.  I keep note books on making books, printing and painting.  I refer back to them often.

This same process can be used to make a larger five hole double pamphlet stitched book.  There is also a version called the "split-pleat Japanese double pamphlet" which separated the front and back covers.  Or you can have one continuous cover following this plan.  Or just stitch two signatures together without a separate cover.

Sunday, March 25, 2018

Printing & Books: Relief printing with linoleum blocks

row boats in the sun
Relief prints can be made from any flat surface that can be carved, wood and linoleum being the most common.  The use of linoleum dates back to around 1913.  Linoleum is easier to carve then traditional wood blocks, requiring less expensive tools.  Unlike wood, linoleum has no grain, allowing for large areas of flat color and a greater variety of textures. 

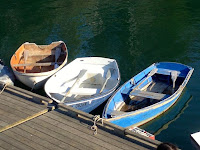
I choose a photo I took of three row boats tied to a dock at Isle au Haute, Maine for my subject.  The photo has large shapes with dark colors, deep shadows, whites and bright sun light.

Linocut
I traced the shapes in the photo to the linoleum using graphite paper.  Then used a sharpe pen to mark all the lines and areas that needed to be carved away.

I used speedball carving tools, starting with the knife to outline shapes to be carved.  The 2V tool was also used to outline, and make medium lines.  The larger 2V and 5U tools were used to remove large amounts of linoleum inside the bigger shapes.  The smaller 1V blade was used to create small precise lines, and the 1V, 2V and 3U shaped blades were used to add texture to the boat hulls and dock.

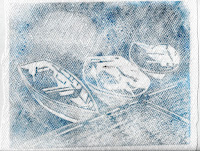
The finished linocut was inked with a thick dark blue ink and places on the printer bed ink side up.  Paper was carefully placed on top of the linocut.  The bed was slid under the printers roller.  The ink on the linocut adheres to the paper creating a 
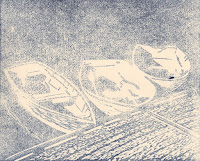
reverse image.  The amount of ink transferred depends on the viscosity of the ink, the amount of ink on the linocut, the type of paper and amount of pressure imparted by the press during printing.  The first print didn't have enough ink or pressure.  I lowered the roller a bit and re-inked the linocut with thinner black ink.  The resulting second print came out much better with sharp lines and smooth consistent areas of color.
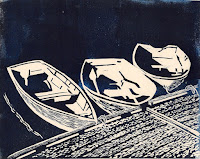
First printSecond print
Now that I was done printing, the remaining ink on the Linocut needed to be removed.  You can use several solvents to remove oil based inks, I used 
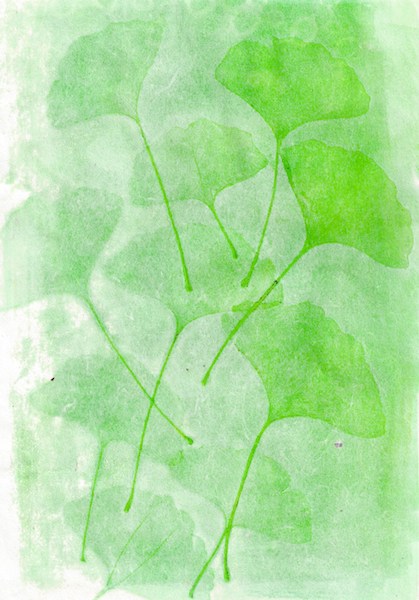
vegetable oil.  I applied some vegetable oil and started rubbing with a paper towel, but stopped. There was still a lot of ink on the linocut so I decided to try using a marble rolling pin and paper towels to pull most of the ink off first.  I was very successful at pulling the majority of ink off the linocut.  I finished up by rubbing the remaining ink off with vegetable oil.  Below is the first paper towel rolling pin print, which was interesting enough to keep.  You can see the paper towel pattern, remnants of black and dark blue ink, as well as a lighter circle where I started to remove the ink in the upper left.

Paper towel print


Sunday, March 18, 2018

Printing & Books: Pressure printing

Pressure printing, or stratography, uses a flexible plate and type-high surfaces. The image is transferred with variating amounts of pressure to the sheet of paper.  The resulting image shows a combination of ink density based on the amount of pressure applied to each area.  The printed image is not as clear and sharp as ones made by direct impressions.

horsetail stained paper
The process is an easy and quick way to make an image that is not reversed.  It can also be used to create textures and patterns from paper, fabric, leaves or other thin objects.  I experimented with paper stacks as well as different leaves. 

For my first print I used a combination of stacked paper, dried false papyrus leaves and fresh horsetail stalks.  There was a significant difference in thickness between these objects and as a result some of the print received too much ink and other parts too little ink.   The horsetails, since they was green and not dry, stained the paper green.  The image at the right shows both the stalks and cut stalks that show up as circles. 

The second print I did using dried ginko leaves and I was able to make a reversed second print.

Sunday, March 4, 2018

Printing & Books: monoprint stencils

Inked stencils (after printing)
In our second class we created a monoprint using stencils.  To create a two color flower print I cut two stencils from card stock.  One stencil represents the flower, with negative space in the center.  The second stencil is of a stem with 3 leaves.  The flower stencil was inked in a pink, and the stem was inked in green. 

We used a floor model printing press to make our prints.

  1. A sheet of paper was placed on the press.  
  2. The stem & leaf stencil was placed ink side down on the paper.
  3. A larger sheet of paper was placed over it all.
  4. The stack was rolled under the press.
  5. The first stencil was removed and the flower stencil was places ink side down on the paper.
  6. The stack was again rolled through the press.
Flower print

The ink from the first printing bled through the ink from the second printing were they overlap.  This could be because the ink from the first printing wasn't dry, or due to the choice of colors.

Using this process you can do multiple printings to create complex prints.

Sunday, February 25, 2018

Printing & Books: Start at the beginning

It was inevitable that after working on an art book that contained text I would start thinking about printing.  Coincidentally I discovered, a "Printing and Book Arts" class offered locally by Katherine Miller, a MFA Candidate in Printmaking & Book Arts at the UGA Lamar Dodd School of Art.  The class included instruction on making various types of prints, and making a simple book.  A perfect fit for me.

Our introduction to printing was to make "direct trace drawings".  The trace monotype process was invented by Paul Gauguin, and has been used by many painters to create prints.  Monoprints and Monotypes are called the "most painterly printmaking process".  I can understand why.  There is a soft beauty to this spontaneous printing process.  Each print is unique, and the printer directly influences the image during the printing process by adding, subtracting and manipulating the print.

Ink drawing
The setup:
  1. Evenly ink a plexiglass plate.  
  2. Place a sheet of thin smooth paper on top of the ink.  
  3. Place a second slightly larger sheet of piece of paper on top of the first sheet.   
Carefully draw an image on the second sheet of paper.  Pressure from the pencil/pen transfers the ink to the middle sheet of paper.

Pressure print
The resulting print is a reverse of the drawing.  So if you want to add text to your print, you will have to learn how to write backwards.

Where I pressed harder when drawing more ink was transferred.  Where lines were close together or crosshatched more ink was transferred.  You can also see smudges of ink where where my hand leaned on the paper while I was drawing.  Fingers or spoons can be used to add texture.