Friday, December 30, 2016

Minature book earrings


I made two types of miniature books.  Ones with decorative paper covers and ones with leather covers.

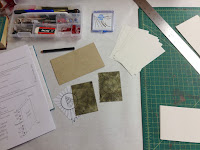
The miniature books with decorative covers are made by wrapping card stock covers in decorative or origami paper.   I used scraps of text paper for the 16 page signature.  The signature was bound to the card stock using the pamphlet stitch and Irish linen cord.  The photo to the right shows the templates as well as cut papers for the books.

Making small books can be harder then making regular sized books!
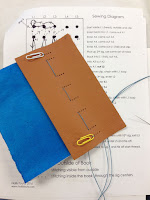
The leather miniature books have two signatures of 8 pages each.  Using two signatures allowed me to stitch the signatures creating a double 'X' pattern binding seen in the photo to the left.

An additional loop of cord was added to each mini book to attach it to the ear wires.  The end result was quite nice.


Friday, December 23, 2016

Leather wrap books

I made three sizes of leather books.  The smallest leather books were based on the Quote books I had previously made.  Because I used 90 lb Stone henge paper, there were fewer folios in each signature of these books.  I printed inspirational quotes in a speech bubble on cloud paper for the books endpapers.  Mother of perl or vintage buttons were used for the book closures.

You can see an examples of the bookmark tags I used on the photo to the right and the pocket and travel book photos below.

Instead of using my wooden handled bookbinder's awl, I used a potters needle tool to punch holes in the signatures for these books.  This tool creates holes that are very uniform in size through the whole signature.  This is important when you are punching a thick stack of paper.

For the leather covers I used my Japanese hole punch.  This is a wonderful tool for punching leather, as holes created by an awl close up quickly making it harder to sew the the signatures in place.


The medium sized pocket leather books were done with a locking and varied long stitch binding.  For the 98 page text block I used Neenah 32 lb paper.  I used recycled nature calendar photographs for endpapers, as seen in the photo to the left.  These books have either traditional leather straps or handmade raku button closures.  An example of each type of closer is in the photo to the left.

These soft leather books open flat making it easy to write and sketch on the pages.


For the large traveler's leather books I used an earlier link and long stitch pattern that has a central diamond on the spine.  The endpapers for these books were recycled maps from an old atlas I purchased at a local library book fair.  I used maps that featured North America, which just seemed perfect for these books.  Below is a photo showing the front endpaper map of one the books.


I added calendar photographs that coordinated with each book's maps to other signatures in the books.  The space between the signatures of these books allows for adding envelopes and other items collected while traveling.

I used traditional leather straps or buffalo nickel concho with twisted cords for closures.  The maps and photographs are to inspire travel to new and wonderful destinations.


Friday, December 16, 2016

Accordion pocket seed books

Vegetable seed book parts
The accordion books were made with a pocket designed to hold either vegetable or flower seeds.  I used 90 lb Stone henge 22 x 30 sheets of paper for the 6 1/2" by 21" strips.  I folded 1 1/2" of the paper strip up to create the pockets for the seeds.  Then accordion folded the strip to create 6 pages.

Seed packets from different vendors vary in size, as do the actually seeds.  So before making any books I made a test accordion out of card stock.  This helped me determine the final size to cut the paper to hold the heirloom vegetable or flower seeds packets I was using.

A foot of garden jute was attached to the inside of the back cover.  After the book is assembled the jute is used to tie the books closed.

Vegetable book front and back covers
For the vegetable seed book covers I used sections of a Jardin vegetable paper.  This colorful paper seemed like the perfect cover for a book containing heirloom vegetable seeds.

For the flower seed books I used paper with a flower design that can be colored.  The black and white covers were a perfect complement to the ink illustrations I added to the back of the flower seed books.

On the back side of the accordion pages I added ink illustrations featuring either a flower or vegetable garden to match the seeds.  Each type of garden illustration is a unique design, but has similar plant elements.

These little books make great gifts for friends that like to garden!


Sunday, December 11, 2016

Selling Handmade books

OCAF has a small but active group of handmade book makers who planned on having a booth at the OCAF Holiday Market, and they asked me to participate!  I have helped my husband Steve sell his glass art at shows and craft fairs, but this is the first time I was selling my own work.  One of the reasons I  haven't had the time to write a blog post recently was because I was busy making books for this event.

To start with I needed an inventory of books.  I made 2 versions of accordion books, three sizes of leather bound books and miniature book earrings.  Thirty books in about 45 days!  The next three blog posts will have more details on each type of book.

Leather books
Accordion seed books


To identify our books we tied unique bookmarks around the back covers of the books.  Each of my bookmarks included a quote about books and my art stamp with a link to my website.

Friday, September 30, 2016

OCAF Small Works exhibit prep

I've been busy painting a few small watercolors to enter in the OCAF Small Works exhibit.  All entires have to be less then 14" in all directions.  For an 8" x 10" matted painting I mark out a 5" x 6" space on watercolor paper.  This gives me a little extra edge space on the finished painting.  I create several small paintings, then choose two or three to enter.  This year I am submitting two landscapes, and a nature painting for consideration.

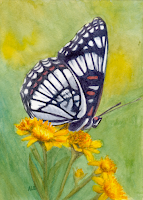
The Weidemeyer's Admiral Butterfly Limenitis weidemeyerii, was painted from a photograph I took at Grand Teton National Park, while on a Naturalist led Butterfly walk at the top of Signal Mountain.  The summit provides panoramic views of the Teton Range, Jackson Hole valley and Jackson Lake.  During our walk we saw several butterflies, but none as spectacular as this western species.  This family of butterflies first pair of legs are so small they resemble little brushes, which gives them their common name 'brushfooted'.  Other members of the family Nyphalidae include: the Monarch, Red Admiral, Blue Morpho and Painted Lady.

The first landscape features the amazing Firehole Spring, one of the most colorful pools along Firehole Lake Drive, Yellowstone National Park.  The spring bubbles and steams but is not a geyser.  The clear turquoise blue water is the hottest part of the spring, so hot that even thermophiles can not live in there.  They prefer the run offs where the water is cooler. Yellow or green mats of thermophiles are found closer to the springs in higher temperatures (up to 167ยบ F).  Lower temperature areas have mats of orange, rust and brown.  In addition to temperature, springs and geysers can be acidic, neutral, or alkaline.  The Ph also determines what bacteria can live there.  One part of the painting that is not very visible at this small size are the white siliceous collars where the water touched the nearby standing dead Lodgepole pines.

After the storm, the second landscape, is of a Yellowstone geyser field lit by sun rays bursting through holes in the clouds as the storm is slowly breaking up.  The steam of the geysers are in sharp relief, between the shadowed trees in the foreground and the dark green distant hills.

Friday, September 23, 2016

Fish live in beautiful places 2

I don't carry a watercolor kit on me when fly fishing, but I do have one in the truck.  Often it is a hike from the truck to the stream, but sometimes you can park very close to the stream.  I took advantage of fishing close to where the Truck was parked to painted the below view of a beautiful small headwater stream of the Davidson river, NC.

It was done in my Moleskin water color notebook using my Van Gogh  Watercolor Pocket Box.  The various shades of green were made using a pallet of: Yellow Ochre, Burnt Sienna, Ultramarine Deep, Cerulean Blue, Permanent Red, Madder Lake Deep, Permanent Yellow and Azo Yellow Medium.


Friday, September 16, 2016

Fish live in beautiful places

I carry a small moleskin sketch book and pencil in a pocket of my Fish Pond chest pack, just in case I feel the urge to sketch while I am out on the river.  When I take a break to drink some water, change a fly or unravel a knot, I will stop to do a quick sketch of a falls, riffle, river bank or other angler.

After spending the afternoon fishing the Gibbon River where it twists through grassy meadows in Yellowstone NP (photo to the right), I did a quick pencil sketch of the bright purple wild flowers along the trail.  I included some notes to help me identify the plant at a later time.  It matches the description of the Thick Stemmed Aster, Eurybia integrifolia.


Friday, September 9, 2016

Grand Teton's majestic mountains

While touring Grand Teton National Park we had several days when the smoke from burning wildfires obscured the mountains.  Normally you can see the mountains from many miles away, but due to the fires the mountain tops faded into the pale blur gray sky.  Wildfires are common in the dry summers, and the Park Service and local Fire Departments spend a considerable amount of time monitoring and fighting fires.  Each fire that is tracked is named.  One of the fires that contributed to the smoke we encountered was the large Berry Fire.
On one of the clearer days, I went back to an overlook I had previously visited to sketch the mountain view across Jenny Lake.  Thousands of years ago glaciers moved through Cascade Canyon, pushing rocky debris ahead of their progress.  Later, when the glaciers retreated, they left behind a mass of rocky debris which formed a terminal moraine creating Jenny Lake.

I had a lovely time sitting in a shady spot while sketching and talking to several people who were also enjoying the spectacular view.


Friday, September 2, 2016

Vast open spaces in a small sketch book

I was recently out west, where Idaho - Wyoming - Montana meet.  This area has vast open plains, tall craggy mountains, brilliant blue skies and many beautiful rivers.  I spent most of my time fly fishing in Yellowstone National Park, but also was able to tour some of the attractions at Yellowstone National Park and Grand Tetons National Park.

Below is a sketch I did of the distant hills, after spending the day fly fishing the Gallatin River, Yellowstone NP.  Like many rivers, this one begins in the mountains and is formed by rain, snow melt that flows into small creeks.  We were fishing in the valley where the now wider river begins to meander.  The banks of this swift flowing rocky river are lined with dense willows.  I was told that moose like to bed down among the willows, but happily we didn't run into any while we were fishing.  The coolness of the water was a refreshing complement to the sunny warm day.


Sunday, August 21, 2016

Views of Portland from my moleskin watercolor notebook

These are some earlier sketches that I did while in Portland.  I really enjoyed my trip there.  There is a wide variety of great food and the public transportation makes it easy to get around town.  I had recently purchased a Moleskin watercolor notebook, that has 60 5 1/2 x 3 1/2 pages and decided to try it out.  The thread bound notebook lays flat which would allow me to create long or tall sketches across facing pages.  I found the 200-gm cold pressed paper absorbed pigment faster than other paper I have used.  Controlling the absorption by lightly wetting the area to be painted helped.  I used a Van Gogh watercolor Pocket Box, using a pallet of: Yellow Ochre, Burnt Sienna, Ultramarine Deep, Cerulean Blue, Permanent Red, Madder Lake Deep, Permanent Yellow and Azo Yellow Medium.

On my first night in town I had dinner at the Portland City Grill.  I had some great food and enjoyed a wonderful view of Portland as the sun set.  I did the below sketch while finishing my wine.


As the TriMet whisked me back to the airport, I did the below sketch of sunrise from the North Street Bridge.


Sunday, August 14, 2016

Architectural reflections


Cities are interesting places to sketch.  There are lots of people, colors and lights constantly moving, day and night.  All this is set against a backdrop of oversized buildings sporting a myriad of shapes, designs and architectural types.

Neoclassical architecture style was popular in the late 18th to early 19th centuries, and is the dominant style of the federal buildings in DC.  However, there are examples of many other architectural styles in the layers of buildings. Egyptian Revival, Victorian Romanesque, Gothic, Neo gothic, Empire, Beaux Art, Craftsman, Contemporary, Modernist, Functionalist and Organic are just a few of the styles.

No matter the style, recently built buildings all boast expansive areas of reflective glass.  As an artist, I am drawn to the play of light and reflections on these buildings.  They provide unique images of life captured in glass, steel, stone and brick.

To the left is the sketch I made of a building's reflection as night began to fall and the final rays from the sun lit cast a yellow glow on it.  Before I could finish, a rapidly moving storm changed the blue sky to gray, whipped the wind up, and pelted my hotel window with rain and hail.

Capturing an image when light is rapidly changing is always a challenge, but this was more difficult than most.  At least I wasn't outside!


Monday, August 1, 2016

Sketching at the Georgia Museum of Art

Once a month the Georgia Museum of Art is open in the evening for people who want to sketch.  On these nights there are few people at the museum besides me and the docents.  I take pad of watercolor paper and my watercolor pencils, but no water (liquids are not allowed in the galleries).  The museum has folding seats that can be borrowed for use in the museum.  I can sit and sketch a piece of art without being in anyone else's way; it's my own private art museum sketch crawl.

Not all art museums allow sketching, and sometimes certain exhibits are excluded.  Some allow access to different galleries at different times and others have sketching led by art instructors.


Why sketch or paint something someone else made?  I agree with Laura Murphy Frankstone sketching is cathartic, and sketching is a chance to indulge my interest in art work I personally find interesting.

Sketching can be of whole pieces of art or just sections of art, focusing on the design, use of color, use of negative space, or other elements.  Sometimes I go to practice certain things, but more often it is just for relaxation.  You can learn a lot from the art work of master painters, and seeing the art in person is inspiring.

The Getty Museum has shared some good tips for drawing in a museum.  If you're in New York there is a sketch group that includes outings to museums.  You never know who you might see sketching at the museum.

Sunday, July 3, 2016

Book embellishments

During the Books of the Earth class we discussed and tried several page embellishment techniques, but had limited time to use them with the books we created.  When I returned home all manner of other things got in the way of working on my books.  Recently I was able to spend some time exploring the techniques we discussed in class as well as other ideas I have read about for adding special touches to my finished books.

Mica encasements

I used thin sheets of mica to cover interesting bits of paper and pressed flowers.  If the mica was thin and the item was small I simply used pH neutral PVA to glue them in place.  The pressed flowers and mica in the photo to the right were glued to a small piece of handmade paper that was then glued to the page.  I left space at the bottom of the page for a bit of text.

Thicker pieces of mica can be attached to a page using small brads.  The object to be covered is first glued to the page.  Then the page is placed on a piece of wood and the mica is position over the image.  Hold the mica in place as you carefully punch or drill holes through the mica and page.  Below is an example of mica fastened using small brads.  I burned a small window in the preceding page creating a small reveal.


Be aware, adding paper, mica, pressed flowers and brads all add additional thickness to the page.  These additions can cause the book to gape.  You can offset the added thickness by removing pages or adding windows.


Pages with windows

This can be used to reveal some of the contents.  To make rectangular and square windows I use a 6 inch narrow metal ruler, a small piece of mat board and a sharp X-Acto retractable pen knife to carefully make small precision cuts.  Below is the finished page window and the rusted imprint that was glued to the following page.


As previously mentioned, windows can also be used to offset the thickness of added items.  In the photo to the right I cut rectangular openings in three pages to offset the thickness of a small rectangular piece of oxidized copper I had added to a page.

Friday, May 27, 2016

Copper covered books

The final two books I made during the class had 5" x 7" oxidized copper covers.  We used plastic boxes to created small chambers to oxidize the metal for our book covers.  Inside the box the metal sits above a shallow pool of ammonia, and a mixture of vinegar and salt crystals are used to patina the metal.  The process created intricate patterns of yellow, pink, turquoise and black on the copper sheets; while the brass sheets developed gold, silver and brown patterns.  The finished plates are sprayed with a thin mate or gloss coating to stop further oxidation and to protect the patina.

While the copper was oxidizing I worked on the the other parts of the books.  The text block was stitched to the leather spine using chain and long stitching.  The pattern required sewing two signatures per station, which is a tight fit.  To adhere the edges of the leather spine to the copper covers the surface of the copper needed to be roughed up.  It was difficult to scratch away even a small amount of the beautiful patina from the copper sheets.

Each copper sheet develops a unique patina, and I had to decide which piece to use for the outside of the front and back covers.  The front cover of the completed book below was my favorite, it reminds me of a river delta with swirling streams.  The weight of the copper cover is enough to keep the book closed without any additional closure.


Friday, May 20, 2016

Mica covered books part 2

We did have some sheets of stabilized mica that split.  The thinner mica was too fragile to use as book covers without additional support.  To support the mica I attached the sheets to a 1/8" inch larger leather cover using mini brass brads.  I used a Japanese punch to create the holes through the mica and leather for the brads.  A small brad with a ring was attached to the back cover of the book, and a twined thread and a small hollow brass ball on the end was used as the closure.  Below are two completed leather books with thin mica front plates.


Saturday, May 14, 2016

Mica covered books part 1

We started by making small 3" x 5" x 1" books with mica covers.  The mica sheets we used were pre-cut stabilized sheets of mica.  This type of mica is less likely to split then natural mica pieces.  The mica is translucent, which allowed us to put small images between the mica and the Lokta paper used for the book cover.  End papers were wrapped around each of the three signatures of the book.

For the second mica book I used walnut dye on the book pages.  I then nipped and ironed the pages flat before folding, punching and stitching them to the book's spine.  Two pieces of Lokta paper were glued together to create the book's spine and also support for the mica covers.  For this book I inked celtic knots directly on the Lokta paper.  The final step was to add a twined thread closure with a small glass bead Steve Hilliard made.  Below are the two finished mica books.


Monday, May 9, 2016

Books of the Earth

I spent a week at the John C. Campbell Folk School taking an amazing book arts class: Books of the Earth.  Holly Fouts was the instructor and Cheryl Prose was the assistant.  The focus was using natural materials to make artful books with variations of the historic long stitch binding.  We worked with mica, natural dyes, wax, rusting and burning to create interesting pages for mica, copper or brass covered books.

We experimented with several tea, coffee and walnut dyes on a variety of paper types.  The berry tea dye changed color, depending on the acidity of the paper it remained red or turned green.  I used this dye on the pages for my first mica book.  I dyed all the pages of the second mica book using a walnut dye.  I used crumpled waxed paper both under and on top of the dyed paper to create additional texture.  The finished paper needed to be ironed and pressed before being stitched to the book spine.

We used small culinary butane torches to heat copper and brass to create colored patterns on the surfaces.   Heat treating metal alters their physical properties.  This is usually done to improve the strength or elasticity of the material (annealing and tempering).  It will also change the color of the material.  This process required careful heat control.  If the metal is over heated all the color is lost.  The trick is to stop heating as soon as the metal starts to develop the color you want, since the metal will continue to change color after the heat is removed.  I plan on using the copper and brass mesh as part of future art book covers.

We used a variety of rusty iron, copper and brass items to create rust patterns on different types of paper.  Vinegar is used to promote rust and transfer it to the paper.  We also experimented with wood burning tools and candles to carefully discolor, scorch, char and burn paper.  

Saturday, March 12, 2016

Watercolors printed on mugs?

I have been using my Canon Pro9000 Mark II series printer to print archival pigment prints on Strathmore 90lb watercolor paper note cards for a while now.  Last past year I donated sets of flowertrout patterns and salmon fly cards to Trout Unlimited, library and other local groups for their fund raisers.

This year I decided to try something different.  I downloaded a template for a wrap around mug and painted four watercolors; Brown trout, Rainbow trout, Brook trout and Cutthroat trout.


I tried to create images that looked active.  The scanned 300 dpi images were uploaded to a commercial web site to be printed on mugs mugs.

I loved the way the mugs turned out, the colors closely match the original watercolors and the fish look great wrapped around a mug.

The mugs will be donated to local Trout Unlimited chapters for their fund raising events.