Monday, March 31, 2014

Double needle coptic stitched book

The double needle coptic stitched book was the most challenging and rewarding book we made.  
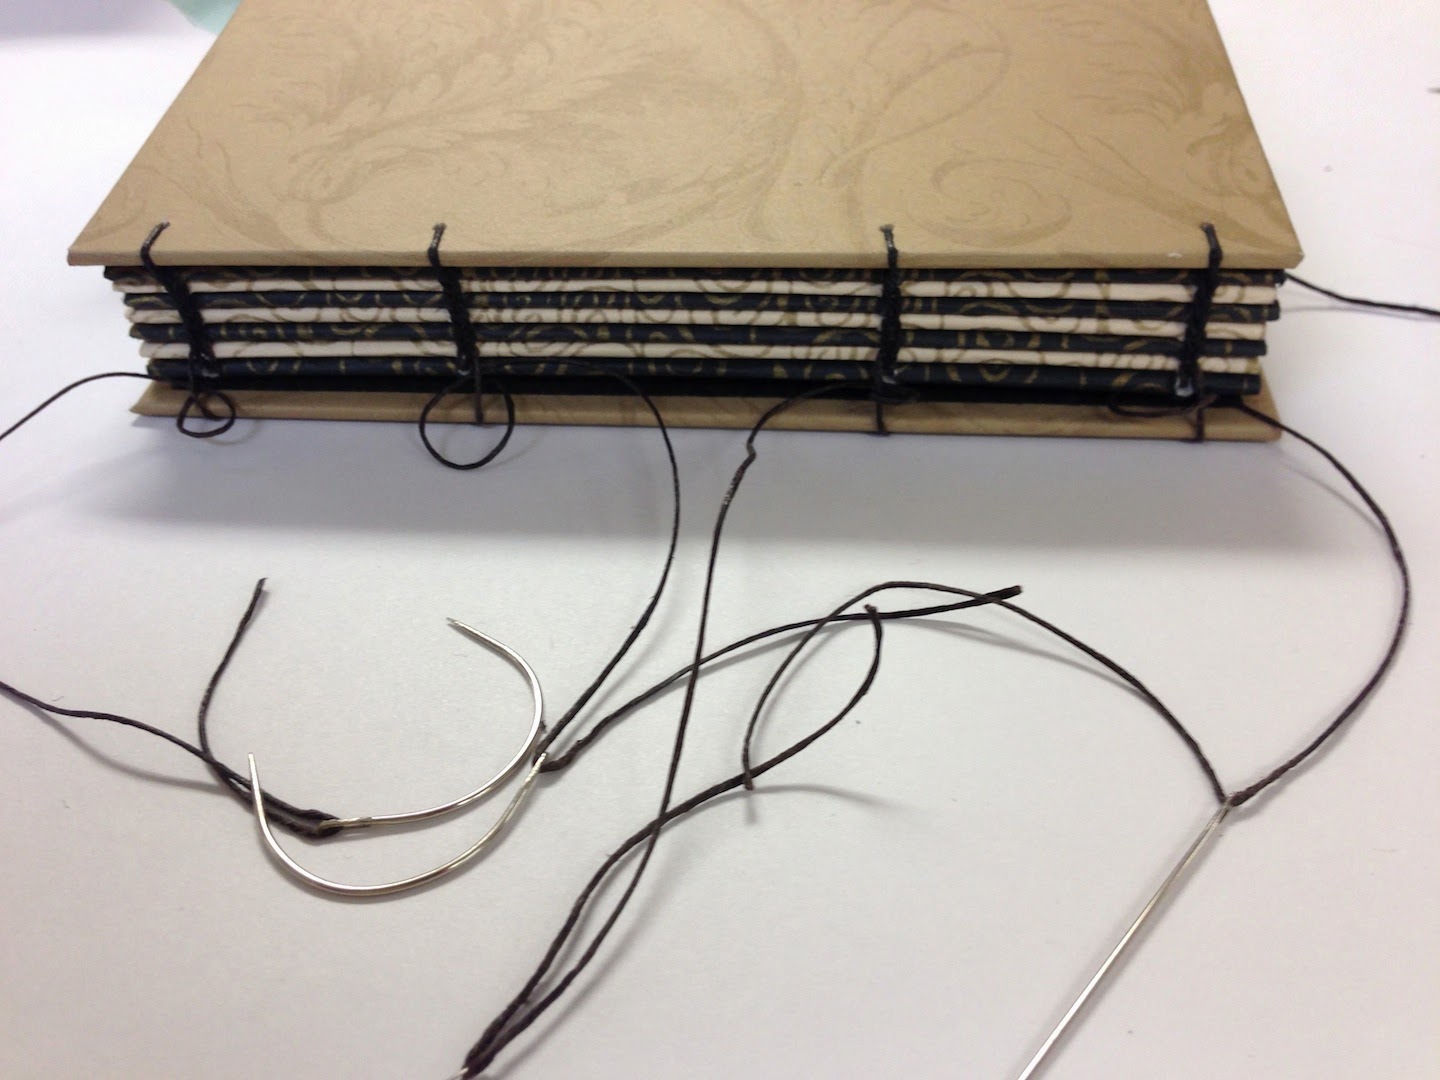
Early Christians living in Egypt are thought to be responsible for developing the coptic style of binding pages, by stitching their edges together and to front and back covers.  The binding stitches form of chain from the folded edge of one signature to the next.  This type of binding is strong and flexible, and allows the book to open flat.  Uncovered the spine of the book exposes both the chain stitches of the binding as well as the folded edges of the paper, which can be very beautiful, as seen in the photo to the right of our classes books.


The 6" by 9" tall book would have seven signatures of eight folios each.  That meant it was time to measure and tear more paper, and fold more signatures.  Because the spine's of the signatures would be visible when the book was complete, decorative paper covers were cut for each signature.  The covers were folded and glued to the spine of each signature.  The finished signatures, at right, were placed under a weighted board to flatten.

The covers and signatures are so close in size only one jig was needed.  The jig has 4 holes (one pair at the top and the other at the bottom).  This type of coptic stitching always uses pairs of holes.  There is a length of thread for each pair of holes and a needle is attached at either end of the thread.  I used an open-ended hole punch cradle and needle awl to punch all the signatures for the books I made in this class.  The signature is placed in the cradle, with the jig on top.  Signature and jig are always pushed up against the top of the cradle to ensure the punched holes will all lineup.

Book board was measured and cut for the front and back covers.  Decorative paper was glued to the outside of the book boards and wrapped around the edges of the board to the inside.  Smaller pieces of a complementary decorative paper were glued to the inside of the book boards, covering the edges of the paper wrapped from the outside (similar to how the accordion book covers were made).  The finished covers were placed under a weighted board to flatten while drying. The same jig was used to determine the correct spacing of the holes on the covers, which were then punched with the needle awl (finished covers at left sitting on the foam board used for punching holes).

The covers and signatures were stacked in order for sewing.  Two lengths of 4 cord waxed thread long enough to complete a pair of bindings were cut.  If the thread is too short additional lengths of thread can be attached using weavers knots (A lesson I learned).  So we could try using both curved and straight needles; one length of thread was attached to two blunt straight needles, and the other thread was attached to two blind curved needles (as seen at right).

We started by attaching the first signature to the front cover.  The thread was adjusted so it was equal for each pair of needles and locked in place using a locking stitch.  I continued adding each additional signature, snugging and locking the stitches in place.  The back cover was attached to the last signature, snugged and locked in place.  The final knots were tied and threads trim off.


Friday, March 28, 2014

Blue leather wrap book

I liked the green leather wrap book so much I decided to made a second one out of blue leather for me.  It used the same dimensions as the first, which allowed me to re-use the hole punch jigs I had already made.  I had to tear down enough paper for another set of seven signatures.  For this book I selected some beautifully embossed paper to use for the endpapers (shown already sewn into the book at right) and a matching 4 cord linen waxed thread.

This design uses a matching narrow leather strap to secure the book.  The strap can be tied, or wrapped around a button or bead.  I was in luck because Steve had just made the perfectly colored cylindrical bead, and I was able to use it for this book.  The strap was secured to the front cover close to the front edge of the wrap with a few stitches; then carefully run under the middle set of long stitch threads of the binding.  Finally the strap was slipped under the cylindrical bead.  The strap was long enough to wrap it around the book twice more (shown at the left).

Below is a close up of the beautiful bead Steve made in his class.  The bead had to be sewn on leaving enough space for the leather strap to easily pass under it.  A photo of all the leather wrap books are class made is on the John C. Campbell Facebook page.


Monday, March 24, 2014

Leather wrap book with locking and long stitch binding

Our next book was a leather wrap book.  For this book we learned how to tear down paper.  We were making books with seven signatures of eight folios each.  For that we needed to tear our larger pieces of paper into 56 sheets of paper.  After tearing, the paper was divided up into eight stacks and folded to make the seven signatures.  Decorative endpapers were added to the front first and last signatures.

We would used both the linking and long stitch to secure the signatures to the leather wrap.  But before stitching, we needed to punch holes in the signatures and the leather wrap.  To do that we created two jigs.  One for the holes that would be punched in the signatures and the other for the holes that would be punched in the leather (seen at left under the needle awl).

Precise measurements are a large part of both the function and look of these books.  Using the jigs helped us punch the holes accurately.  Note: it is worth checking and double checking before punching the holes.  Once the holes were punched and the needle was threaded it was time to start sewing!   I used turquoise 4 cord linen waxed thread and a straight blunt tapestry needle.  At left is a photo of the book after I had finished attaching the first signature.  Only six more to go.

To the right is the book after I had finished sewing in all seven signatures, snugging the thread and tying the final knot.  The book is sitting on my class notebook open to the page with my notes on how the two jigs align.  Hollis provide us with great handouts, but I find taking notes and drawing diagrams while working helps me fix ideas in my memory.  And there was a lot to remember.

The final touch was to add a matching glass bead and hand twined thread closure.  The bead was one of the many beautiful glass beads Steve made in class that week, and it was a perfect match to the colors of the leather.  The hand twisted thread used threads that matched the two colors of the bead.  Hollis and Cheryl taught me how to correctly sew on buttons and twine thread, for which I am very thankful.  Steve is now the happy owner of a handmade book.


Friday, March 21, 2014

More accordion books

Since they were such fun to make, I made two more accordion books.

The second book was made from two folded strips of paper, which I connected using 2 small strips of the same decorative paper used for the cover (left).  The paper was a beautiful sepia print of feathers.  Of course cutting the paper also cut many of the feathers in half.  I really liked having whole feathers, so I drew back the parts that had been cut off using a Pentel sepia color brush.  The sepia ink matched the paper perfectly and the brush tip let me easily create both thin and thick lines.

The feathers in the center of the book turned out so well I inked in feathers on the inside front and back covers as well.  I also added a small pocket on one page, where I inserted a card with small bird drawings.

The front of the book I decorated with a die cut bird silhouette a class member gave me.  I lightly painted it with watercolors to resemble a Blue bird.  Finally I sewed a set of three handmade glass beads on to the cover for the ribbon I had attached to the inside of the cover to wrap around.

My husband Steve made the beads for me.  While I was in the Book Arts class he was taking Marjorie Langston and Terri Hale's Glass Bead Making class.  The beautiful blue flower bead is a mandrel implosion bead.  The petals are created when colored dots of glass that have been added to the bead are heated and flow down the mandrel stretching out into streaks of color.


My third accordion book was made to be a gift for a friend who was dog/cat sitting for us while we were at the Folk School.  I chose a colorful  feather patterned decorative paper for the cover, a simple two hole button that perfectly matched the turquoise of the decorative paper's background, and pink ribbon to match the color of the feathers.  I carefully centered the button on the front cover and marked the location of the button holes.  I used a needle awl to punch two holes through the front cover of the book, and stitched the button in place using a turquoise 4 cord linen waxed thread and a straight blunt tapestry needle.

On the inside front cover you can see the square knot I used to secure the button, and a cutout decorative feather which sits on top of the glued end of the ribbon (yes, I forgot to glue the ribbon in place before glueing the paper to the cover).  I was amazed that I had a pen with the correct color of ink (Farber-Castell Pitt artist pen brush Pink Carmine 127) to draw the feathers on the inside covers of this book.


Sunday, March 16, 2014

Fun making accordion books

Accordion books look like the name sounds.  The pages are made from a single long strip of paper that is folded in a zig-zag.  The folded panels represent one signature.  The ends of the paper strip are glued to the front and back covers of the book.  The covers are wrapped in beautiful decorative papers.  These fun books can be made use different foldings, bindings, closures and sizes of paper.

We started with a long strip of 3.5" wide paper that we carefully folded into eight even panels.  The boards were cut larger then the dimensions of the text block, providing a 1/8" square.  We used beautiful hand printed decorative papers Hollis had brought to cover of the boards.  The decorative paper was cut larger then the board's dimensions so it could be wrapped around to the inside.  

I glued the end of a length of ribbon to the inside front cover before the end pages of text block were glued to the inside of the covers.  I used a Pentel Sunburst Metallic gel pen to added some corner embellishments to the front and back pages.  Then cut a few of the small spirals from a scrap of the decorative paper and glued them to the corners of the pages.

Excess glue is carefully wiped up with a moist paper towel, and wax paper was inserted between the pages to keep any missed glue from sticking them together.  Then the assembled book was carefully placed under a board with a brick on top to flatten the cover and pages while they dried.  At the end of the day we had a table of brick covered books.  

The next day our book were ready for us to add final touches.  I needed a button for the ribbon closure, but it took me a few days to find the right one.  I found the perfect button at the  John C. Campbell Folk School store.  The handmade raku button was impressed with a spiral design similar to the decorative paper used for the cover.  Since the button had two holes I was able to sew it on leaving a space for the ribbon to pass under the button between the threads.


Thursday, March 13, 2014

Getting on the same page with book binding terms


There were nine students in the Book Arts class, taught by Hollis Fouts and assistant Cheryl Prose.  A few students had bound a book before, but most of us had not.

We started with some basic book binding terminology:
  • Folio.  A single sheet of folded paper (purple at right).
  • Signature.  A grouping of multiple folios together (green and purple together).
  • Text block.  Multiple signatures that together make up the pages of a book.
We went over the parts of a book which would help us follow the discussions on how to assemble books.

We started by folding a single sheet of paper into an unbound book, then created a simple pamphlet book.  While not very impressive, this was my first book.  The text block consisted of a single signature of 4 folios  sewn together using a 3 hole pamphlet stitch (finished knotted on the inside of the pamphlet below). 


Folding and stitching these simple pages helped me think through what we were doing and memorize the terms.

Sunday, March 9, 2014

A bookbinding class is in my future

As part of a larger project I wanted to make a small watercolor book.  Since I had never done any of this before, I read up on bookbinding on-line and purchased a simple kit.  I assumed this would be a quick way to learn everything I needed to know to make my watercolor book.  I was very wrong.

The online tutorials I found provided a plethora of ways to make books.  It was a little like going down a rabbit hole.  I discovered many interesting and unusual types of books.  Books with windows, pop-ups, flags, accordion folds, and origami folds.  Books that used buttons, sticks, leather and metal.  There are really a lot of cool book structures.  While very interesting, they were not what I needed for this project.

In contrast to the expanse of information I found on-line, I hoped the kit would provide me with an in depth view of how a specific type of book is made.  The book kit contained very basic instructions, backing board to make the book cover, and a group of signatures ready for binding.  Following the directions I laid out the backing board on the cover and glued it in place. Then I glued the signatures to the inside of the back cover, then the inside of the front cover.  Now the closed assembled book was weighted and left to dry.  When I went to open the dried book it would not open more then a few inches.  This was not right.  I detached the pages from the cover and started over.  This time I glued the pages to the cover while the cover was completely open.  The finished book would open flat, but it wouldn't close.  The paper around the hinge folded and bunched.  This was not right either.

Frustrated I gathered several bound books and started to really look at the mechanics of how books work.  How the pages are attached to the covers.  How the spine flexes and bends when the book is opened.  How all the parts fit together to make a book that can be opened and closed (something I always took for granted).  


So my first effort at bookbinding showed me there was more to learn then I had thought.  As luck would have it, the John C. Campbell Folk School has classes in bookbinding and I signed up!