Thursday, September 17, 2020

Watercolor Journaling kits

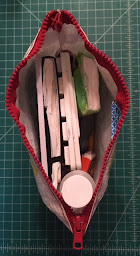
I have 2 watercolor journaling kits.  The small kit is designed to carry everywhere; meetings, museums, gardens, restaurants, and traveling by boat, trains or planes.  It contains the minimum items I need for painting:

  • Paper Mate Sharpwriter mechanical pencil
  • One black fine tip permanent ink pens
  • Set of water brushes (3 round and 1 flat)
  • Artists erasers (Factis Artists eraser or Prismacolor kneaded eraser)
  • 2 oz dropper bottle
  • Kleenex packet
  • Small watercolor journal or block (a Moleskin watercolor notebook and watercolor block of postcards are in the photo below)
  • Watercolor travel kit with professional paints (a Van Gough Watercolor Pocket Box is in the photo below)
  • Waterproof clutch I found at the Frist Art Museum in Nashville several years ago.

My large watercolor kit I use for sketch crawls, weekend trips and hiking.  

  • All the items listed above for the small kit
  • 2 oz spray bottle
  • Several Kleenex packets
  • One Copic sepia fine tip permanent ink pen 
  • 6" plastic ruler 
  • 6" plastic triangle
  • X-Acto retractable knife
  • Clear wax crayon
  • Guerrilla painter composition finder
  • Gray scale and value finder
  • Spiral bound Strathmore visual journals 

In addition to the what is needed to paint, this larger kit has space for a water bottle, snack, sunglasses and a hat.  If I will be out in the sun for a long time I also take a three legged folding chair and a portable shade umbrella.   


I purchase many supplies from local art stores, but I also shop on line with the following venders:
Tuesday, September 15, 2020

Watercolor project notebooks

I have a few watercolor project notebooks for different types of painting.  All contain written notes, sketches and swatches of paint.

  • I use small watercolor pads for testing paint mixes while painting. 
  • I use a medium size one for first drafts of cards.
  • The largest one is a sketch book used for projects.

  • The paint testing watercolor pad (shown to the right) has descriptions and examples of color mixes.  Tests for paint transparency.  It also includes the recipe I use as a base for shadows.  


    Below are two pages from a card note pad.  They are test paintings with swatches that identify the colors and mixes used in the painting.  


    The project notebook has sketches, quick paintings, swatches of paint and notes on colors and each test painting that was done.  The page on the left is were done aa part of the Dynamic Watercolors workshop I took at the J. C. Campbell Folk School.  The page on the right are working notes for two paintings from photos of the Grand Tetons National Park.


    Sunday, September 13, 2020

    Journals and bookmaking notes

    One of the items I took to my first bookmaking class was a handmade journal someone had given me to keep notes in.  

    My journals include:

    • Class notes.
    • Quick sketches.  
    • Scraps of paper and leather.
    • Cord to illustrate twists and knots.
    • Other items used in bookmaking.


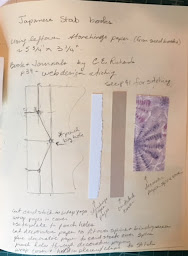
    Keeping journals is very helpful.  I refer back to them all the time to find out what type of paper I used for pages, how many pages were in each signature, what were the page and cover dimensions, what dye I used on the paper, how to stitch a spine pattern or tie a knot.  I have even sent photos of my journal pages to someone else to explain how to make a book.


    Tuesday, August 4, 2020

    Online wattercolor class

    I hadn’t done much painting this year, since all the art classes had been canceled due to the pandemic.  No trips to John C. Campbell Folk School or weekend workshops at Spruill, or classes at OCAF or Lyndon House.   I really needed the push to paint that a class provides.  We meet once a week for four weeks online, and uploaded our finished work to a shared space were we could comment and discuss the paintings.  

    The class focus was on using water to controlling how the paint moves on the paper.  We practiced adding very wet paint to dry and wet paper.  Adding dry paint to wet paper.  Using a dry brush to remove water and paint from the paper.

    Then we painted a landscape from a photo.  I roughly sketched in the buildings and edges of the field.  I wet the sky and painted a morning sky with red and yellow.  I painted in the field where the light was reflecting off the wet grass.  I painted the buildings where the rising sun was casting long shadows.

    I painted the dark tree line and used a dry brush to pick up pigment from the tree tops.  

    I painted the grasses in the foreground, leaving  some areas white for the flowers.  Finally, I added more shadows.


    Next we painted a white dogwood flower.  The only thing defining the white flower are the shadows.  They are soft, but need to be dark enough to give the petals shape.  

    For the center we practiced negative painting.  Painting the dark spaces between the yellow pistils.  

    Finally we used dark paint for the background letting the colors mix.  The darker the background the more the flower shows up.  Too dark or the wrong mix of colors creates a muddy background.

    For the third painting we painted a humming bird.    These birds have distinctive color patterns and shape.  The position of the head, placement of the bill and eye all need to be correct.

    The tips of the wings are indistinct and a trail follows the wings to suggest movement. The pose of the bird suggests reaching up, so I added an orange trumpet vine flower.

    The background was painted wet on wet, allowing the colors to mix.  The darker shades around the flower and bird help define their shapes.


    For my final painting I selected a photo of a pink azalea.  I used one red and one blue pigment for the flower.  

    The lighter pink shades are made by mixing more water with the red paint.  

    The shadows are made by mixing blue into the red paint. 

    The background was painted wet on wet and has indistinct green leaves and additional pinkish flowers.  


    Friday, May 1, 2020

    Hearts to thank frontline community workers

    This spring the John C Campbell Folk School asked for donations of heart shaped crafts for their new Hearts at Work project.  Almost 3,000 hearts were sent from students, staff and instructors who have attended the school.  The school presented the hearts to essential workers in the local county.

    Heart shaped books are not new, and there is an online tutorial based on the traditional heart shaped book.  However, I remembered seeing a unique small heart shaped book pattern in one of the books I have.  Books and Journals, by Constance E. Richards included instructions for making a heart book necklace.  I adapted her design to make my little books.  

    Each book is made up of origami folded pages cut to form a heart.  The pages are glued together so that the can open.  Heart shaped card stock is used for the covers, and a ribbon is used to tie it shut.  I was happy with how these little origami fold books turned out.