Saturday, August 22, 2015

Leather quote books

As a special request, I am binding some small leather books that have pages sized perfectly for one special quote.

Quotes come from many sources; family, friends, a favorite line from a book, song or movie.  Some quotes can make you laugh, others can inspire.  A quote can remind you of the person who said it, the place you were when you first heard it, or the feelings you had at the time.  Collecting quotes, sayings or proverbs allows you to re-read them whenever you want.  The perfect place to save your favorite quotes is in a handmade book.  A place you can personalize the quotes with doodles, sketches and drawings.  A place that can grow to include a life's worth of quotes.

"If its worth writing, its worth writing in a handmade book"
  Hollis Fouts

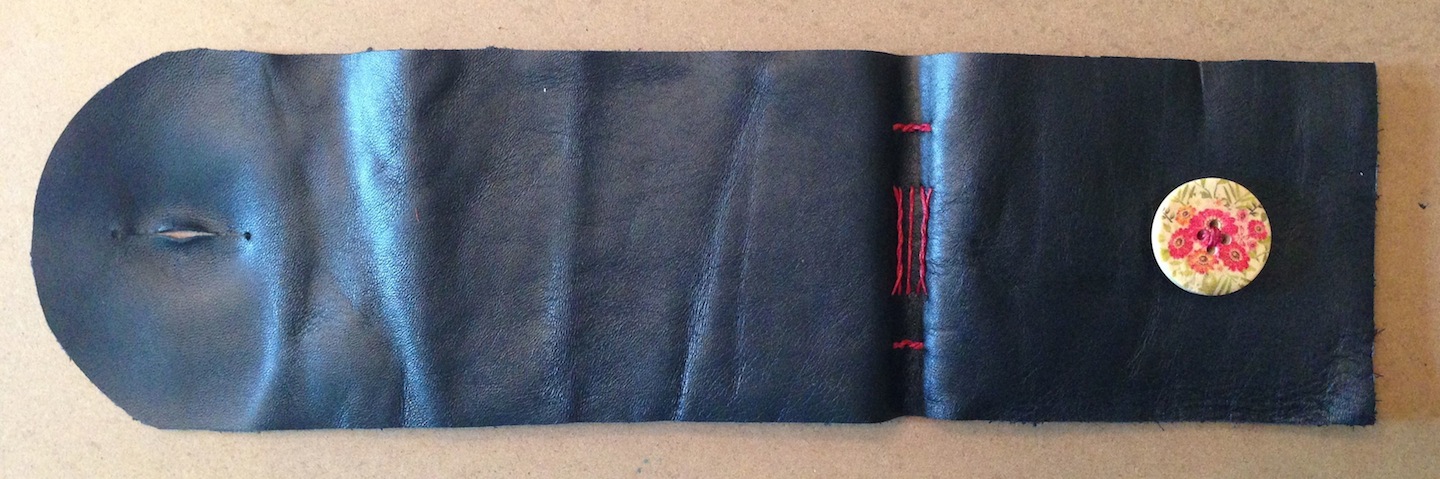
The first one has a black leather wrap cover with a large wooden button closure.  There are 50 landscape oriented pages, divided into five signatures of 5 folios each.  French speckled 80 lb paper was used, and the first and last signature have tipped in maroon colored end papers.  Red Crawford 4 ply waxed linen thread was used to bind the book and attach the wooden button.  The leather wrap was cut in a semicircle, and a hand decorated wooden button was added for the closure.


The second one has a red suede leather wrap cover.  The ten signatures contain five folios, forming 100 portrait oriented pages.  Japanese inspired blue and gold wave pattern paper was used for the end papers on the first and last signatures.  To match the end papers, torquise Crawford 4 ply waxed linen thread was used to bind the book.  Two signature templates were required for the binding pattern.  The leather wrap was cut at an angle to match the diamond shaped raku button used for the closure.


Thursday, August 13, 2015

Volunteer Sunflowers, part 3


The tale of the Sunflowers didn't end with my painting.  After the flowers were pollenated, the ray flowers shriveled and fell off and the flower heads drooped.  It would take several weeks for the seeds to finish maturing and be ready to harvest.  My plan was to harvest and dry the flower heads with the seeds intact, to later user to feed the birds.  Every few days I checked to see if they were ready to be harvested.

One day I found cracked sunflower seeds on the backs of the flower heads.  Birds had discovered the seeds and were beginning to eat them.  Over the next week I watched Gold Finches, Cardinals and Crows come to the garden and wrestle individual seeds from the flower heads.  The flowers that had fed the bees, and provided me with beautiful subjects to paint were now feeding the birds too.

Seeds were pulled from the edges first, then further towards the middle as they too matured.  The birds had to be quite acrobatic to remove the seeds, hanging over the edge of the flower, or even upside down.  Their struggles would make the flowers shake violently.


Sunday, August 2, 2015

Volunteer Sunflowers, part 2


I spent a lot of time studying the sunflowers before deciding what to paint and how to approach the painting.  In the end I decided on an off center close up of the flower with a single Bumble bee feeding.

The disc florets spiral out from the center in Fibonacci sequence.  This pattern provides the optimal number of flowers and seeds for the given space.  The pattern can be easily seen in the un-opened disc flowers at the center.  My pencil sketch included the placement of the ray flower petals and the spiral lines in the center's unopened florets.

The palette I worked with included warm and cool yellows and blues; as well as Yellow Ochre, Burnt Siena and Burnt Umber.  The whole central part of the flower would involve a lot of negative painting.  Using the cool yellow I painted the whole center of the disk.  A wash of blue and warm yellow was added the center.  Warm yellow was used for the ray floret petals around the disk.  Then working from the outer edge of the disk inwards, Burnt Sienna was add to define the spent disk flowers.  Yellow was mixed in to the Burnt Siena to lighten the color as I moved toward the center and began to define the open disk florets.  Additional colors were added to darken the spirals in the center and define the unopened florets.


Background color was added between the petals and additional shades of yellow were used to continue to define the open disk flowers.  The bee was painted.  Many additional layers of color were added to develop the background, flower and bee.